OSX Lion & Mountain Server part 03 – Getting the router prepared

While there are plenty of resources out there to help you get up and running with OS X Server, it is the initial set-up and configuration that can really get you confused and trip you up. In this series, we’ll deal with the fundamentals of getting started with OS X Server. Getting this right is the hardest part, so go through these articles to get the groundwork in place, then use the resources at the bottom of the pages to get into the detail of configuring and using OS X server post install.
We’ve dealt with the types of server installs in part 01 of this series and the network set-up we need to have in place in part 02. Before we jump in and actually install the software there is one final stage we have to look at before we continue, and that’s router set-up. You can do many of these router setup tasks later, so don’t worry if you have missed a few settings, but it does make life easier to get this in place ahead of time.
Your network router is set-up to allow common tasks like web browsing and mail traffic to come in and out. However, many potential services are blocked by default. This is a good thing since it shields your network from potential intrusion.
So in order to let some of OS X Server’s services pass to and fro we need to set-up something called port forwarding which is opening up ports on the router to allow more services to work.
Apple Airport Extreme or Not.
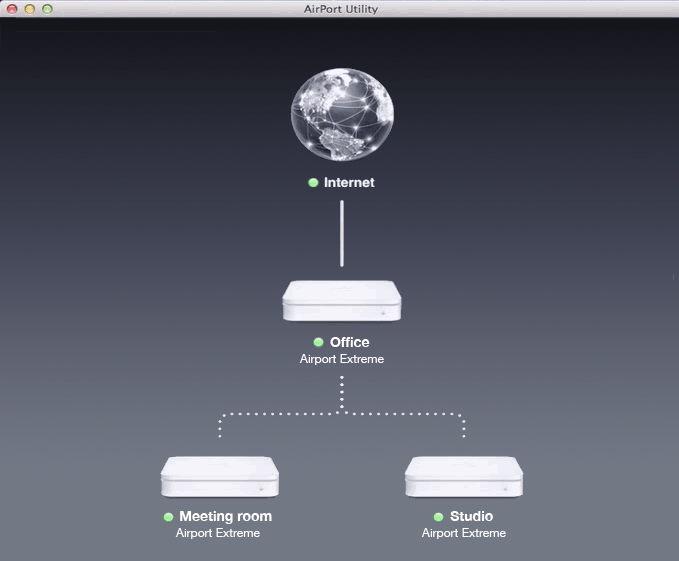
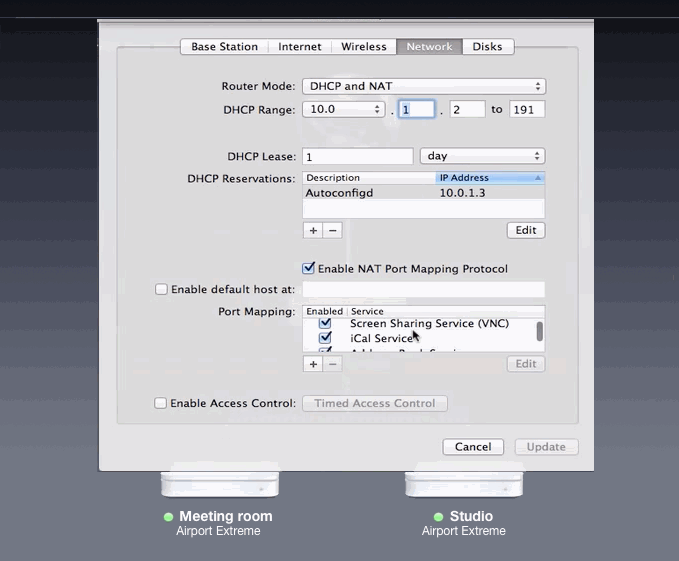
If this whole idea of port forwarding fills you with dread, then you might consider replacing your current router with Apple’s Airport Extreme router. Why? Well, if Lion or Mountain Server detects an Airport Extreme on your network, it will set-up port forwarding for you automatically.
So if you are considering one of these then this port forwarding part is easy, just let the server installation do all the work for you. You can see below how the ports are opened by the server when you access an Airport Extreme base station through Airport utility (see below).
Port Forwarding for Other Routers
Most routers on the market use a web interface to change their settings, so each manufacturer will have a slightly different interface and approach to configuring port forwarding.
There are guides to configure port forwarding for most of the main routers on the market over at the portforward.com website, so check out that site to find a comprehensive guide for your make of router (when you select your router you will see a series of links to specific ports but you might want to find the link to the Default Guide for a general help guide). If you don’t find your router’s link, go to the router manufacturers site and seek out the guide to your particular router there. If all else fails, feel free to ask a question on the forums.
Common Ports to Open up for OSX X Lion Server.
What ports you need to open depends on what sorts of services you want to cross your network, so take a look at the table below and decide what services you may need. Don’t worry about not opening up some services at this stage since this port forwarding task is one of the things you can do as you start configuring Lion Server.
Take a look at the table below to see the main ports used by Lion Server’s services.
| Service | Port number | Protocol |
| Address Book Server | ||
| Address Book Server | 8800 | TCP |
| Address Book Server SSL | 8843 | TCP |
| File Sharing | ||
| File sharing (Apple AFP) | 548 | TCP |
| File sharing (Windows SMB/CIFS) | 161 | TCP |
| iCal Server | ||
| iCal Server | 8008 | TCP |
| iCal Server using SSL | 8443 | TCP |
| iChat Server | ||
| iChat Server | 5222 | TCP |
| iChat Server using SSL | 5223 | TCP |
| iChat Server, server-to-server connection | 5269 | TCP |
| iChat Server’s file transfer proxy | 7777 | TCP |
| Mail Server | ||
| Mail: IMAP | 143 | TCP |
| Mail: IMAP using SSL | 993 | TCP |
| Mail: POP3 | 110 | TCP, UDP |
| Mail: POP3 using SSL | 995 | TCP, UDP |
| Mail: SMTP legacy SSL submission | 465 | TCP |
| Mail: SMTP standard | 25 | TCP, UDP |
| Mail: SMTP submission | 587 | TCP |
| Remote connection | ||
| Remote connection SSH (Secure Shell) * | 22 | TCP, UDP |
| Remote Management (Apple Remote Desktop) | 3283, 5900 | TCP, UDP |
| Web service | ||
| Web service HTTP | 80 or 8080 | TCP |
| Web service HTTPS (secure web service via SSL) | 443 | TCP |
| Screen sharing | ||
| Screen sharing VNC | 5900 | TCP |
| Virtual Private network | ||
| VPN L2TP ISAKMP/IKE | 500 | UDP |
| VPN L2TP | 1701 | UDP |
| VPN L2TP IKE NAT Traversal | 4500 | UDP |
| VPN L2TP ESP (firewall only) | IP protocol 50 | n/a |
| VPN PPTP | 1723 | TCP |
* The only suggestion I have is that you not enable SSH unless you have a real need for it. Its a favorite port for real techies (it’s used for terminal access to remote computers – if you are interested), but SSH is also a magnet to hackers. You may find that your server logs fill up with attempted SSH intrusions if you enable that port.
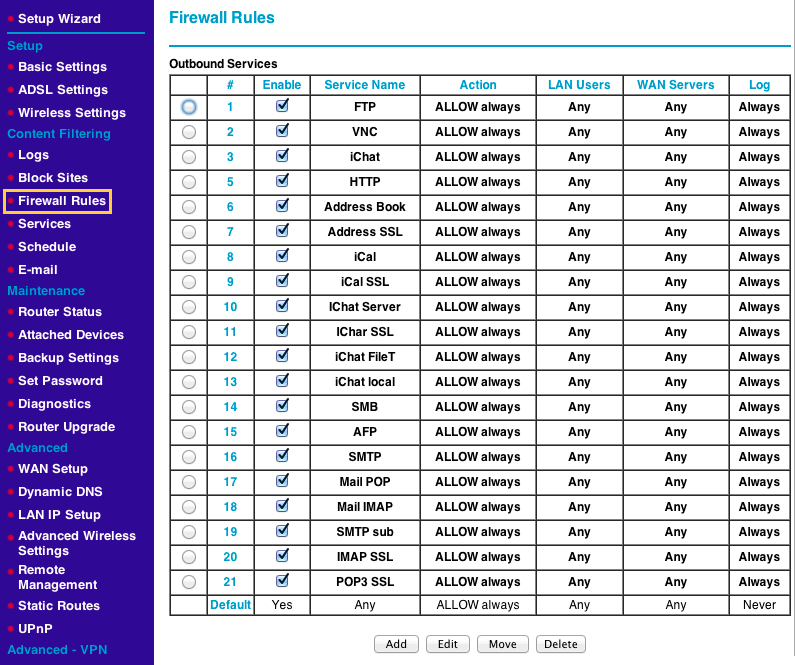
Here’s a screen grab of the ports I have opened on the Netgear router that I have on my network.
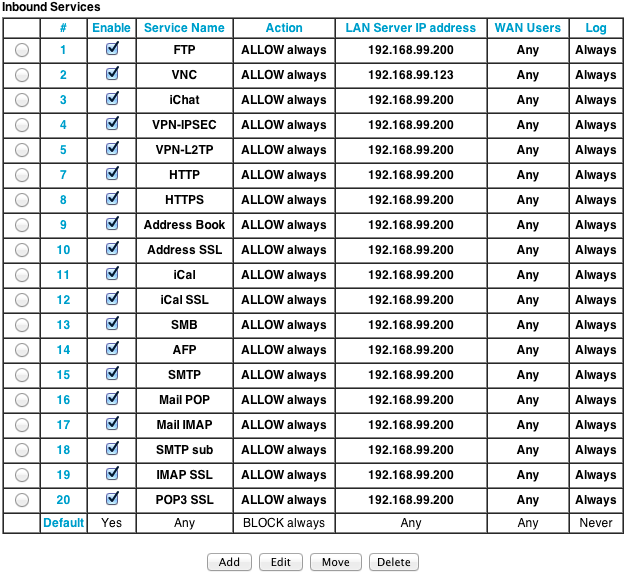
So, with the router set-up to pass through all the services your server is going to use, we are now ready to actually download and install OS X Server. Notice all inbound services are going to a local address of 192.168.99.200 – that’s the manually assigned IP address I have reserved for my Mountain Lion Server on the network, you may be using a different private address for your setup.
I told you we would get there in the end.
With all the preparation done its now time to dive in and install OS X server. You covered the essential parts that are the biggest pitfalls when getting a server installation set up correctly, now I’ll hand over to Todd Olthoff and his excellent series of tutorials that will take you through every aspect of OS X Server from installation to setting up all the services. See the links below and have fun getting up and running with Apple’s Server.
Other articles in the series
OSX Lion & Mountain Lion Server part 01 – What type of server
OSX Mountain Lion & Lion Server part 02 – getting the network right
Find out more
Once you are ready to start installing OS X Server these excellent series of video tutorials from Todd Olthoff get into every aspect of configuring and running Lion and Mountain Lion Server. Check them out to get under the hood with everything about OS X Server.
Mac 10.8 Mountain Lion Server Tutorials on YouTube by Todd Olthoff
http://www.youtube.com/playlist?list=PL01BB6048468891F7
Mac 10.7 Lion Server Tutorials on YouTube by Todd Olthoff
http://www.youtube.com/playlist?list=PL31EB3651C1625406