Do You Have A Backup – #5: Manual and Time Machine Backups
Now that we have discussed What and Where to backup, let’s start to talk about how to do it.
A Manual backup is simply a copy you make of whatever you want to have protected. For example, you make a backup of your pictures simply by copying them from one drive to another. If the image on drive A is lost for some reason, you can copy it back from drive B.
Manual backups are perfectly fine and would probably be sufficient for most folks. All you need, after all, is a copy of your important stuff somewhere other than on the internal drive, just in case that internal drive fails. But manual backups have some downsides, too. First, they are manual, which means you have to remember to do the copying. And frankly, we humans are not good at remembering to do those things when they need doing. We tend to get busy, forget to do things and only realize we haven’t done the backup when we actually need it. We can use reminders to nag us to do them. We could use Apple’s app Reminders to create a task due whenever we think we need to make a backup, then when it pops up a notification, we take care of it. Or we could create a repeating calendar event to pop up a notification that we have scheduled 15 minutes for backup activities. But again, we can get distracted, or busy, and get rid of the prompts without actually doing the work, again realizing it only when we NEED the backup and it’s not up to date.
In addition, manual backups don’t really work well for backing up applications because applications put various preferences lists (plist) and configuration files in odd locations and we don’t know, necessarily, where they all are. You can back up the /Applications and ~/Applications folder and still not have what you need to restore to where it was.
So, it would be great to be able somehow to automate backups so that they took place without us having to get involved. Fortunately, there are solutions that allow just that! And one is free, included with the macOS.
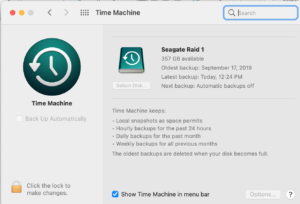
That freebie is Time Machine. Time Machine can be found in System Preferences, where clicking on the Time Machine icon opens this window:
In this window you can see that Time Machine for this system is presently set NOT to backup automatically, but is set to backup to a drive called “Seagate Raid 1.” To configure Time Machine you click on the lock icon in the lower left corner and enter an administrator account password, then the greyed out parts of the window will become enabled and you can select the disk you want to use for backups, and click on “Back Up Automatically” to have TM make a first, full backup, then incremental backups every hour, automatically, in the background, with no further action from you. This blog post is not about all of the ways to use TM, so here is a link to Apple’s own user guide for the product: Apple Time Machine
TM defaults to hourly backups for 24 hours, then consolidates those hourly backups to a daily version for a month and finally to weekly backups older than a month. I prefer not to have an hourly backup because my system doesn’t have data that critical on it, so I use TimeMachineEditor to schedule my TM backups twice daily, once a noon and again at midnight. That’s all I need.
Do note that TM is very efficient in making backups. Basically, after the first full backup, it only copies over any folder or file that is changed. For any folder or file that is NOT changed, it creates a link in the current backup to the previous file in the backup. To Finder and many other utilities, this link looks exactly like a real file or folder, but it is not, it’s just a link. And given that the link may go back many links to the last time a file changed, it’s important NOT to mess with the links using anything but Time Machine. We have often seen issues where someone tries to write into the TM backup directly, usually with catastrophic consequences (Autosave can be the culprit here). So, while you CAN use Finder to read a file from the backup drive, be very sure you do not write into that backup as you could destroy the integrity of the entire backup database and have to start all over with a new backup.
In addition, you need to be aware that if you leave TM turned on, but disconnect the external drive it uses, it will create “snapshots” on the internal drive every hour. When the external drive is reconnected, TM will use those snapshots to create the backups on the target drive as if it had been connected. But in the meantime, the snapshots take up disk space on the internal drive. So, if you don’t plan to make regular backups, or leave the destination drive attached, turn off TM.
Next time, third party backup applications.
