OS X Mountain Lion: The Mac-Forums Guide

Contents
- Preamble
- Upgrading through the Up-to-Date Program
- Prepping for the Upgrade
- How to Create Your Own OS X Mountain Lion Install DVD or USB Drive
- Upgrade/Install Process Itself
- Post-Install/Finishing Touches
- Conclusion
![]()
Preamble
Welcome to OS X 10.8, the ninth iteration in Apple’s OS X operating system line. Codenamed “Mountain Lion”, OS X 10.8 continues the convergence of OS X and Apple’s mobile operating system iOS. In this guide, we’ll take a look at what this means for you, how to get started and some tips for making this a successful upgrade! More specifically, we’ll cover the up-to-date program for those of you who have brand new machines, how to prepare for the upgrade, how to create bootable media (should you wish to have this) and some helpful advice for performing the install and post-install configuration.
Before we begin, let’s take a look at the system requirements for Mountain Lion. Instead of simply copying them here, head over to this page and use the chart to determine whether or not you meet the requirements. The table is fairly straight forward and should help you determine whether or not you’ll be able to run Apple’s latest operating system. If you do not meet those requirements, you will be unable to run Mountain Lion. Feel free to continue reading though if you’re interested in what an OS X upgrade looks like.
![]()
Upgrading through the Up-to-Date Program
The up-to-date process is straightforward but requires patience on your part. First, you’ll need to head over to your national Apple store website (this does matter because you need to submit purchase and machine info) and navigate to the up-to-date page. Try going to www.apple.<country code>/osx/uptodate for this should get you there. If that doesn’t work, head over to the Mountain Lion page on your national Apple page and click the free upgrade link at the bottom.
Once you’ve started the process, begin the wizard by clicking the request button. Fill in the required information. To make things easier, make sure to have a copy of the receipt handy (for the purchase date) and your serial number. If you’d like to get your serial number quickly, simply go to the Apple menu (top left hand corner) > About This Mac > click on the version number label twice. The first time you do it, you’ll notice that it changes to a build number and the second time, you’ll get your serial number. Once you’ve submitted your information, you’ll receive a reference number. Hold on to this.
The next part may be a little confusing for two reasons. First, Apple’s been having a rough time managing this release so it may take a while and a few emails (for example, I’ve gotten four emails from them and I still can’t get my redemption code) and second, you’ll get two emails so make sure to check your junk mail folder if you only get one. You should also be patient – many people (myself included) had to wait 48 hours and you may not get both emails at the same time.
As we noted above, you’ll get two emails. One will contain an encrypted PDF with redemption information and the other will contain the passcode for that PDF. Once you’ve used the passcode, you can use the redemption code in the PDF on the Mac App Store. Open up the Mac App Store and click the “Redeem” link on the right hand side under the “Quick Links.”
Note: As we’ve noted above, this has not been the smoothest process for Apple and us customers. Not only have there been time delays and invalid redemption codes sent out but Apple is having trouble managing passcodes. I (vansmith) was sent three passcodes for a PDF (that I never got until after the third passcode was sent), none of which worked.
![]()
Prepping for the Upgrade
Since this will be the first OS upgrade for many of our members, we thought we would share some steps to take in preparation for the upgrade. Think of these as “best practices” suggestions. We haven’t always followed these steps but we should (do as we say, not as we have done before).
We assume that you’ve made sure your Mac meets the minimum system requirements (see preamble). When contemplating a significant upgrade in OS versions, such as shifting from 10.7 (Lion) to 10.8 (Mountain Lion), it’s also a good idea to examine the requirements to see if some change breaks any of your “mission critical” software. Most developers will have this information prominently posted on their websites.
Once that’s done, it’s time to prepare your system. There are a few things you should do to make sure the process goes smoothly.
- Use Disk Utility to verify your hard drive. Repair any errors that are found. If the drive has a clean bill of health, you can rule that out as a cause of any problems you may experience after the upgrade. We usually don’t bother verifying and repairing permissions since these errors are usually corrected during the installation/upgrade.
- If you are having system problems, now’s a good time to perform some basic troubleshooting. Unless you are going to start with a clean installation, it’s not a good idea to update an unstable system. We recommend OnyX as an easy to use tool for maintenance that you can’t get with Disk Utility.
- Make a thorough backup of your data. OS X updates don’t usually ruin data but why take that chance? If your system is stable include system files in your backup. Including system files in the backup means you can more easily revert to your current OS if necessary. I prefer to use a “bootable” clone for this step. With such a clone, you won’t have to re-download part of your existing OS, search for the right DVD, or pray your Lion recovery partition is still intact. Take a look at our recent article on backing up your files if you’ve never done this before.
How to Create Your Own OS X Mountain Lion Install DVD or USB Drive
If you want to do a clean installation of Mountain Lion , you’ll need to install it on some sort of physical media. Since OS X Lion, Apple has pretty much made the OS download only, but it’s fairly easy to burn a bootable copy of Mountain Lion to give you a bit more flexibility and a back-up of the OS for troubleshooting and re-installs.
Note that the Mountain Lion installer will delete itself once installed, so its vital to do these steps before you run the upgrade for the first time, so when it finishes downloading and launches for the first time, quit out and make your back-up first before installing. Once purchased, you can download it again. However, that’s just wasting time and bandwidth.
Good News, There’s an App That Will do it For You
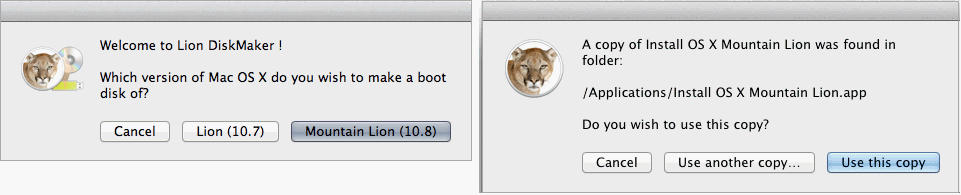
French developer Guillaume Gète, already known for Lion Diskmaker, has speedily updated his app to support Mountain Lion. Just download his app, unzip it and run. It will find the Mountain Lion disk image for you and give you the option of creating a USB disk or DVD. If you find this both time saving and useful, then make sure you return the favor and donate a few bucks for his effort.
Do it Yourself Step by Step
Download Mountain Lion from the Mac App store. The installer will download to your Applications folder as a single app. It will automatically launch so quit out before continuing.
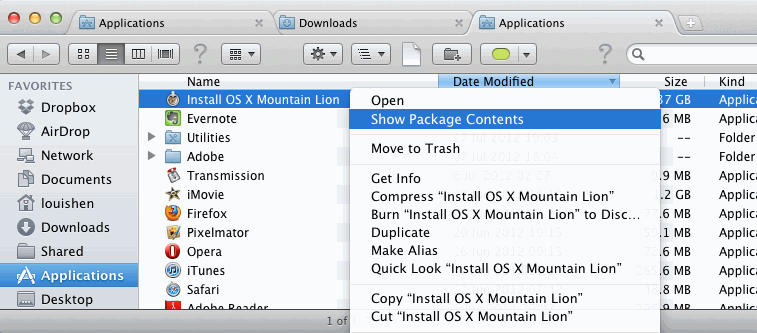
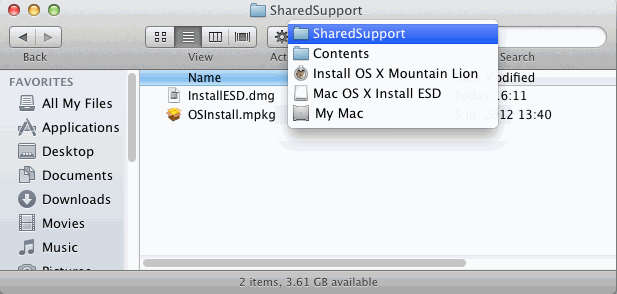
Right-click on the installer icon and select Show Package Contents. The installer is actually a series of folders packaged as an app so you can navigate to Contents > SharedSupport > InstallESD.dmg – that’s the install disk image you want. Keep that finder window open for the next steps.
Create a Bootable USB Installer
Attach your USB drive (it must be larger than 4 GB) and open Disk Utility (it’s in Applications > Utilities).
Find your USB drive in Disk Utility’s left-hand sidebar. Go to the Partition tab and select 1 Partition from the drop-down menu and select Mac OS Extended (Journaled) in the format menu. Note, that you can select more than 1 partition if your disk is large enough and you want it partitioned, as long as the first partition is at least 6 GB for the Mountain Lion installer.

Select the Options button under the partition area and choose the GUID Partition Table radio button in the dialogue that pops up. Without this step the disk will not be bootable. Select OK and then Apply in Disk Utility’s main window. Note, this will erase the drive so make sure you use a USB drive you are happy to reformat.
Click on Disk Utility’s Restore tab, choose the InstallESD.dmg image file you located earlier as the source (you can drag it from the finder into Disk Utility’s source field) and your USB partition as the destination (drag it from the left sidebar in Disk Utility). Hit the Restore button and it will create your bootable USB Mountain Lion drive.
Create a Bootable DVD
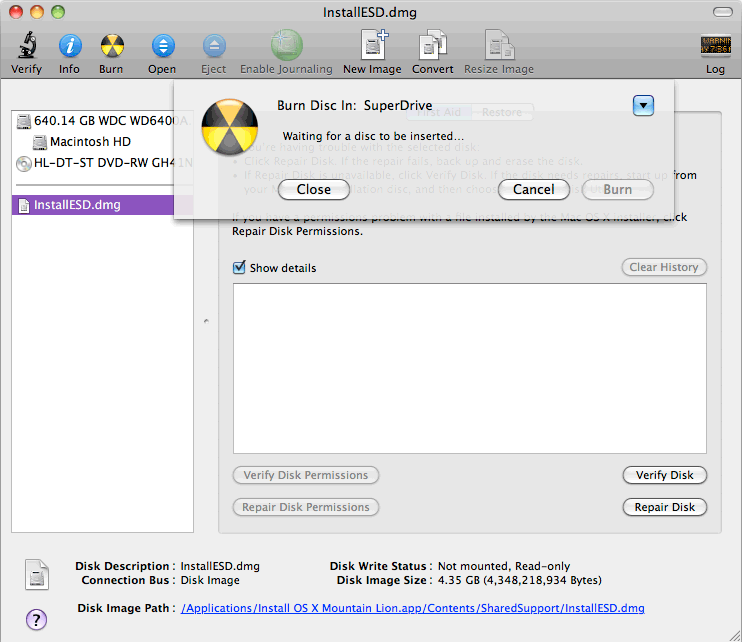
Make sure you have a blank DVD (you will need a double layer DVD). Insert the DVD. Open up Disk Utility and drag the InstallESD.dmg from the Finder window into the left-hand sidebar. Select the InstallESD.dmg disk image in the left hand sidebar, and select the Burn button. If you cannot see a Burn button select Show Tool bar from the Windows menu. Once done you have a bootable DVD installer disk.
Using the USB drive or DVD
Attach the drive or insert the DVD. Reboot your Mac and hold the option key when you hear the startup chime. When given the option, select the bootable Mountain Lion drive from the screen.
The benefit here is not only the ability to install Mountain Lion from an separate drive, but also the ability to use Disk Utility to troubleshoot an errant boot drive and recover a Mac from a Time Machine backup. Note that Mountain Lion creates a recovery partition with all these features on your boot drive, but that’s no good if your main hard drive goes south and you need to restore a Mac quickly after installing a fresh unbroken boot drive.
![]()
Upgrade/Install Process Itself
After you’ve created your bootable install drive or DVD (highly recommended as a backup tool and if anything happens while installing/upgrading) you are free to begin. If you’re planning on doing upgrade, just run the Mountain Lion app you downloaded from the App Store. It will take about 20-30 minutes and then the computer will restart. After it boots back up, it should continue as nothing happened, logging you in to your desktop. The only change being that you’ll be running Mountain Lion instead of Lion.
If you are doing a fresh install, then it will be a little similar, but the process should take slightly longer. Boot from your installer, then open Disk Utility and erase the partition you want to install Mountain Lion on. Once erased, make sure it is formatted for Mac OS Extended (Journaled) and you are good to go. Quit Disk Utility and return to the installer. Install Mountain Lion and enjoy!
Post-Install/Finishing Touches
If you did the upgrade option, congrats, you’re done! All your settings should be the same. So far, the only thing I have found that didn’t stay is the unhidden library folder, but that is an easy fix. Open Terminal, and copy in the following command to unhide your library folder (note that, by default, it’s hidden anyway so this may not be a concern for you):
chflags nohidden ~/Library/
If you had your dock customized for a different look, easily done with Candybar, you may notice it has reverted to a default looking dock. Unfortunately, with 10.8, the custom dock is no longer an option, at least until further notice.
Some apps may require updates before they’ll function properly on Mountain Lion. The version of Little Snitch I had, had to be updated before it would run, and since it was a login item, it told me as soon as it tried to launch. If you find that applications no longer work, check for updates as many developers will have issued updates to ensure compatibility. If no compatible versions are available, feel free to start a thread and someone will help with either a workaround or a search to find a suitable and compatible replacement.
![]()
Conclusion
If this was your first OS X upgrade, congratulations for making it through. If you find yourself lost, stuck or suddenly with less hair because of the stress regardless of your experiences, let us know. Many of us have done this many times so we’ve seen just about every issue. However, if you stick to the basic plan of “prepare, backup and check compatibility”, you should be fine.