Crop image to exact pixel size

Joined
Feb 11, 2009
Messages
471
Reaction score
0
Points
16
I have to upload a picture with an exact pixel size (300x300).

Someone explained that I would have to crop the photo first and then resize.

Google searches come up with a large number of alternatives.

What is the best way of going about this?

Someone has mentioned that Preview is a tool possibly.
 
Joined
Feb 14, 2004
Messages
4,781
Reaction score
166
Points
63
Location
Groves, Texas
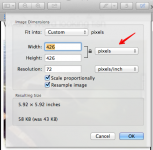
You may not need to crop it. Open the pic in Preview. Tools menu, Adjust size.
Change the dropdown to pixels. Input size in boxes. Save.

Screenshot 2014-09-09 12-55-55 2014-09-09 12-56-04.png
 
OP
T
Joined
Feb 11, 2009
Messages
471
Reaction score
0
Points
16
Thanks for the detailed tip. It was easy to follow.

However, if I scale the picture proportionally I don't get a 300x300 picture. Rather a 300x233 pixel picture.

Do you know how to first crop the picture so that it is a square? And then resize.

It's a picture I have to upload and the website spent half a page detailing the importance of a 300x300 pixel picture.
 
OP
T
Joined
Feb 11, 2009
Messages
471
Reaction score
0
Points
16
Figured that one out myself.

Edit the photo in iPhoto and crop the size to a constrained size, which would be a square.

Then open in Preview and adjust the size as suggested.

Thanks for the help.
 
Joined
Feb 14, 2004
Messages
4,781
Reaction score
166
Points
63
Location
Groves, Texas
Actually you probably can do both in iPhoto, but whatever works.
 
Joined
Apr 15, 2018
Messages
4
Reaction score
0
Points
1
Mac Preview (or other Mac Air tools ... ): I have to resize a whole lot of images

Size constraints are that the resized images will be 1920 x 600 pixels for a realtor's website

I have a bunch of images from various sources and various sizes (4092 x 5000, 2024 x 1600, etc.)

Want to try out different "framings" for these images (the most visually-appealing crop) before I cut them down (since obviously 1920 x 600 is not a multiple of any of my source images, so I can't simply resize by constraining the proportions ... )

In the command+K feature, as I "hover" around different sizings, it tells me the size I'm potentially about to crop to ... but the numbers move so fast. Is there maybe a key combination so that I can "lock into 1920 x 600" while I move that shape around the screen, and so test various options for the composition of the cropped and resized picture?

Thanks very much!
 
Joined
Mar 11, 2009
Messages
306
Reaction score
28
Points
28
Location
Missouri
Size constraints are that the resized images will be 1920 x 600 pixels for a realtor's website

I have a bunch of images from various sources and various sizes (4092 x 5000, 2024 x 1600, etc.)

Want to try out different "framings" for these images (the most visually-appealing crop) before I cut them down (since obviously 1920 x 600 is not a multiple of any of my source images, so I can't simply resize by constraining the proportions ... )

In the command+K feature, as I "hover" around different sizings, it tells me the size I'm potentially about to crop to ... but the numbers move so fast. Is there maybe a key combination so that I can "lock into 1920 x 600" while I move that shape around the screen, and so test various options for the composition of the cropped and resized picture?

Thanks very much!

There are 2 ways of doing this with what is already on your Mac. The easiest may be to use "Photos" as long as all the photos are larger than what you want to crop. From the picture you want to crop select and at the top Right hit Edit, next Hit Crop at the top middle and from there scroll down to the bottom and select Custom. Type in the sizes you want. You can then drag the picture around till you get what you want. Tap Crop and you are done. I would make a Duplicate of the picture before I start. Preview will work too, but you will have to make a Template from another picture, again make a Duplicate before you start. Since you can't start from a blank image in Preview you will have to make one out of another picture, open any picture and Duplicate it from the Preview File Menu, Give it a new name like Realtor Template and save it. Now you can use the Markup menu to select the Square Box tool, with no outline and a White fill. Drag it out to cover the picture and save again. Select a few of the picture you want to resize and drag to the doc and drop on Preview and they will now show along with the White Template you just made. Tap on a picture in the side bar, then Tap on the picture and use command c to copy the picture, next tap on the white template in the side bar and it will be in the center, tap on it and use command v to paste your picture on the template. You can then drag the blue handles to cover the white with the picture. Now you can drag the picture around till you get what you want. Once the picture is like you want it, Export it with a new name, don't use Save or Save As. Sound like a lot of work but once set up it can go pretty fast.
 
Joined
Apr 15, 2018
Messages
4
Reaction score
0
Points
1
Hi Pomeroy,

Thanks *so* much for your tips!

As it turns out, for what I'm trying to do, there are pros and cons to each method.

I find it singularly annoying that I can't resize an image (easily) in Photos —*That would make it intuitive to try masking the image with my custom aspect ratio crop (Facebook has some version of what I was hoping for, as I recall, when you change or upload Profile Photo ... There are a couple "toggles" (right word) to get it right, and fit into a square.)

Preview is good, and is less of a bother to export things from — I mean, really, "Who does Photos think it is", to import stuff out of Finder, and then ask me to re-export it to Finder — it's all a lot of work, thank you very much, Apple.

So I *really* like your method of creating a "mask" from a random photo by renaming it, adding a coloured rectangle, resizing what ensues, and exporting that to some appropriately-named .jpeg file (I found it most helpful when I had file dimensions in the file name, like "3840 x 1200.jpg" or something short-and-to-the-point —

That way, the dimensions were easy to read in Preview's thumbnails down the side of the screen ... )

Thanks again,
"Branda"

PS: I may come back for more —*my troubles aren't over yet. It's proving a bit harder than I'd hoped to turn, say, 'Myles Armstead - Working for You - 5184 x 3456.jpg' into ' ... 1920 x 600.jpg' because the image proportions are so very different. In other words, I actually have to study each image and see if it even can be done ... I may need to go back to the drawing board, so to speak, and source some new, squatter, images.

I *did* care to write back, though, and say thank you in a timely manner, because I was touched by the fact that you wrote, and aren't online communities wonderful, and thank you so much.

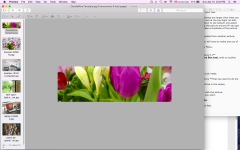
PS2: Another trick I learnt, psst, pass it on (LOL), is that for some images, I can use "your Preview mask 'n template method" as the "background", and then just copy-paste some size of the original image onto it (and even add more borderless rectangles above and below ... :)) to make a frame.

PS3: Also, Using your Preview Mask 'n Template Method (Thanks very much!!), one improvement I would suggest is: To make several templates, with multiples of whatever dimensions one ultimately needs.
Ergo:
1920 x 600.jpg
2880 x 900.jpg
3840 x 1200.jpg
4800 x 1500.jpg
5760 x 1800.jpg
7680 x 2400.jpg

This is supposed to help (in a way that 'made sense at the time ;-)) ...

Cheers.
Screen Shot 2018-04-15 at 5.54.15 PM.png
 
Joined
Nov 15, 2011
Messages
956
Reaction score
154
Points
43
Location
Toronto
Your Mac's Specs
MBP 16” M1max 32/1tb and bunch of other mac/apple stuff
Just thought I'd add, in case it's helpful for the future, a really super fast easy way (and what Ive used in photoshop/illustrator) shortcut to use the selection tool in preview you drag and force it to a perfect square size... When you drag the selection over an image to crop, simply press shift while dragging and it'll automatically constrain the selection to a square selection no matter what size you drag it to. This is useful if you need to make the image an even square size, and you'd rather drag the selection to crop what you want visually because after selecting you can drag that square selection (place mouse in the middle of the selection it'll turn to a "dragging hand") around the image instead of doing it blind in a dialog box. :)
 
Joined
Apr 15, 2018
Messages
4
Reaction score
0
Points
1
Hey Groovetube,
Thanks for your idea(s)! To clarify, this is just for "squarey crops", right? I've instructed myself to learn Photoshop/Illustrator for almost two decades now — tsk, tsk! — yet seem to have somewhat managed without them so far, I'm afraid. So this is for future square-crops, correct, and only in Adobe??
Merci!
"Branda" :)
 
Joined
Nov 15, 2011
Messages
956
Reaction score
154
Points
43
Location
Toronto
Your Mac's Specs
MBP 16” M1max 32/1tb and bunch of other mac/apple stuff
Yes holding shift while you use the selection tool will always constrain the selection to a perfect square. You simply drag to the size square you want, let go and you can mouse inside the selection, and drag it to the square crop you want. This works in just about every graphics program I’ve tried including preview. In fact many of the general shortcuts I use in photoshop work in preview as well.

That’s the visual way to do it. Of course the other way via dialog box (previously descibed) works as well.
 
Joined
Apr 7, 2018
Messages
9
Reaction score
0
Points
1
Location
USA,LA,New Orleans
I think you can overcome if you resize your picture, Thank you
 
Joined
Sep 29, 2017
Messages
22
Reaction score
0
Points
1
Location
South Africa
Your Mac's Specs
Processor : 2.6 GHz Intel Core i5 Memory : 8GB DDR3 1600 MHz Graphics : Intel Iris 1536 MB Storage
If you have illustrator at hand there is a easy tip to this, click the square object on the art board do not drag it... it will give a pop up asking you what size you want enter 300 pixels by 300 pixels. It will then create a box click on this box go to objects > fit art board to selected object. it should create a black line around it then delete the object. Then bring your image in either enter its dimensions in manually or grab a corner while holding ⇧ ( shift key ) ( this does not keep it a perfect square specifically but mains its height and width ratio ito be more accurate. ) and drag it into the art board. Then just save it for web. And in case you missed something before saving it will bring up a menu with the dimensions which are edible there too before the final save.
 

Shop Amazon


Shop for your Apple, Mac, iPhone and other computer products on Amazon.
We are a participant in the Amazon Services LLC Associates Program, an affiliate program designed to provide a means for us to earn fees by linking to Amazon and affiliated sites.
Top