OK, well, sticking with the party analogy that will eventually break down, what you need to do is to get entrance to the party. The network is the party, you want to get in. A guard will ask for proof you are allowed in, which will be the password for your network. So, the printer will have to show that permission by providing the password to the router. Once that is done and the invitation (password) is approved, the router will assign the printer a "name tag" for the party, basically a four-part number typically starting with 192.168.x.y or 10.0.x.y where the "x" and "y" are between 1 and 255. That number now belongs to that printer and nobody else at the party.
Now you go back to the Mac and through System Preferences look for the printer at the party. In System Preferences/Printers & Scanners, you click on the "+" to add a printer and then a list of all of the printers the Mac has seen will appear. If your printer isn't there, you click on the globe like icon above the list and provide the address (four-part number) of the printer and the Mac will look for that specific address and negotiate the contact between them. In the end, you should see your printer added to the printer list and available for you to use.
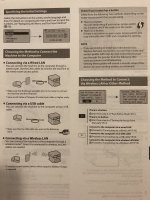
So, with that party analogue, you can dive into page 10. Have fun, matchmaker!
BTW, the "button" approach is easier as it is roughly the router shouting out, "Is there a printer out there somewhere?" and the printer answering "ME! Over here!" and the two connecting. So if there is a button and if you prefer to use it, that should work, too. Then once the printer is in the network (party) you pay matchmaker in System Preferences...
")