
- Joined
- Mar 30, 2005
- Messages
- 9,571
- Reaction score
- 25
- Points
- 48

Using the Disk Utility in macOS, you can create a blank disk image for storage. A disk image (.dmg file) is a file that looks and acts like a mountable device or volume.
In other words, it’s a file that contains other files and folders. You can fill an empty disk image with data, then use it to create disks, CDs, or DVDs. There’s a lot of benefits to disk imaging, as noted by Dmitry Shesterin at https://www.faronics.com/news/blog/the-benefits-of-disk-imaging. Among them:
- There’s no need to set up every computer separately or set up the whole operating system from scratch. One image can be put on many machines.
- You can make as many different images as you want. This gives you the flexibility to change back to any preferred configuration.
- If you want to keep data from a computer, you don’t need to keep the actual hardware around. Just create an image of that drive and store it.
With macOS, to create an empty disk image, launch Disk Utility by opening Launcher, go into the “Other” folder, and then click the Disk Utility icon.

With Disk Utility open, choose File > New Image > Blank Image.

To Create a Disk Image
- Enter a file name for the disk image, add tags if necessary, then choose where to save it. This is the name that appears in the Finder, where you save the disk image file before opening it.
- In the Name field, enter the name for the disk image. This is the name that appears on your desktop and in the Finder sidebar after you open the disk image.
- In the Size field, enter a size for the disk image.
- Click the Format pop-up menu, then choose the format for the disk:

- If the disk will be used with Macs, choose Mac OS Extended (Journaled) or Mac OS Extended (Case-sensitive, Journaled).
- If the disk will be used with Windows or Mac computers and is 32 GB or less, choose MS-DOS (FAT).
- If the disk will be used with Windows or Mac computers and is over 32 GB, choose ExFAT.
- To encrypt the disk image, click the Encryption pop-up menu, then choose an encryption option.
- Click the Partitions pop-up menu, then choose a partition layout.
- Click the Image Format pop-up menu, then choose an option:
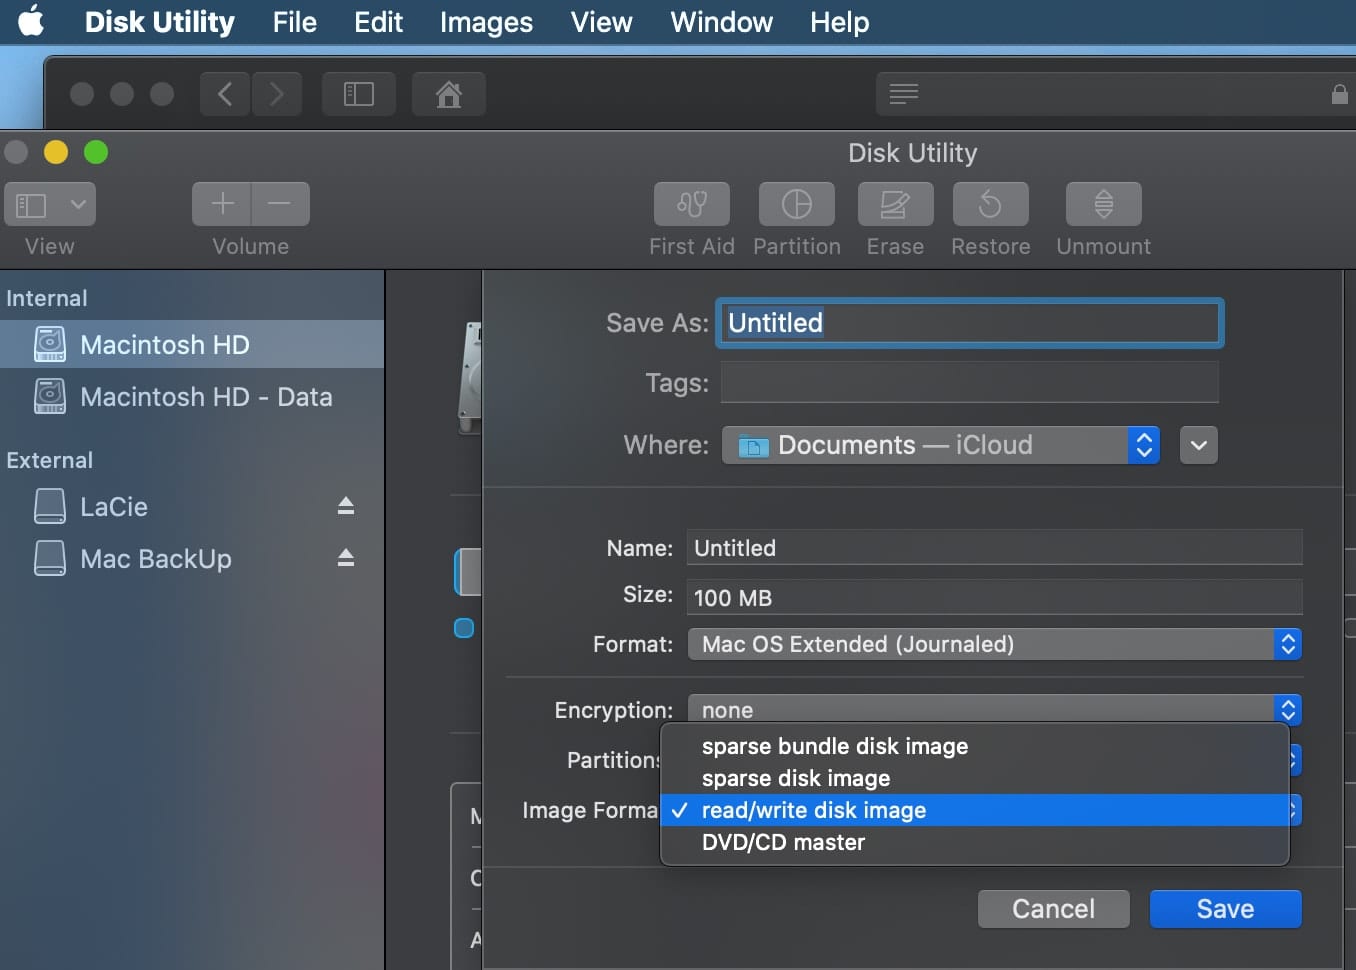
- Sparse bundle: Same as a sparse image, but the directory data for the image is stored differently. Uses the .sparsebundle file extension.
- Sparse disk image: Creates an expandable file that shrinks and grows as needed. No additional space is used. Uses the .sparseimage file extension.
- Read/write: Allows you to add files to the disk image after it’s created. Uses the .dmg file extension.
- DVD/CD master: Changes the size of the image to 177 MB (CD 8 cm). Uses the .cdr file extension.
- Click Save, then click Done.
Disk Utility creates the disk image file where you saved it in the Finder and mounts its disk icon on your desktop and in the Finder sidebar.
These instructions apply, for the most part, to other versions of macOS besides Catalina. However, I’m using Catalina on a 16-inch MacBook Pro for this tutorial.
Click here to view the article...
