- Joined
- Jul 6, 2008
- Messages
- 863
- Reaction score
- 52
- Points
- 28
In another thread, forum member dc2bluelight questioned the ease of use of GarageBand as an option to make some edits to an mp3 file. I was honestly surprised by this notion, as I've always found GarageBand eminently easy to use, so I told him I'd start a separate thread about it. So, here's how you'd import an audio file (be it mp3 or any other format) into a GarageBand project for editing. I am using the latest version of GarageBand, version 10.3.2.
(tl;dr: Open GarageBand, click "Choose", click "Create", drag audio file onto track, have fun editing)
1. Open Garageband. You'll see this window:
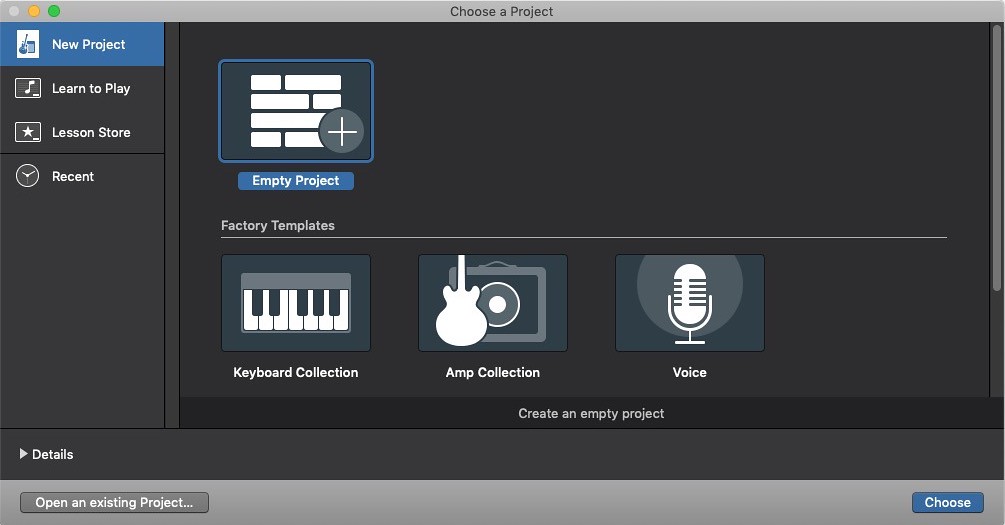
"Empty Project" is selected by default, and that's what you want, so all you have to do is click the "Choose" button (or simply hit the Enter key on your keyboard).
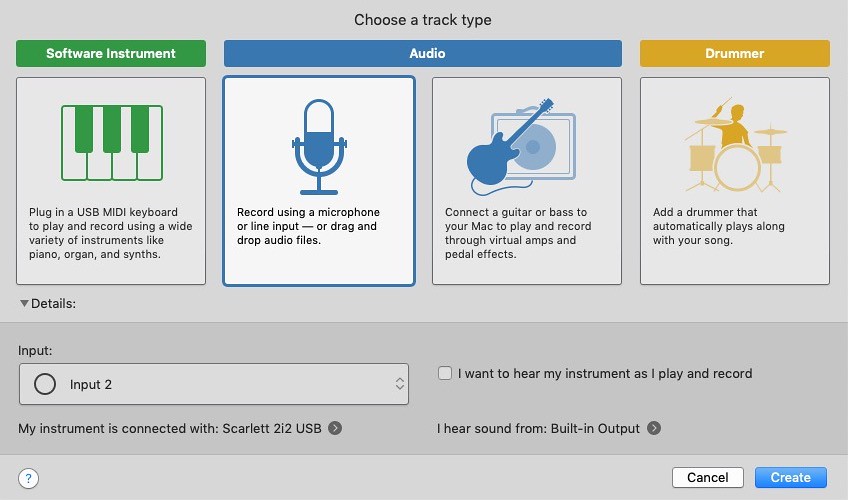
2. You'll now see the project with another window prompting you to choose a track type. "Record using a microphone or line input -- or drag and drop audio files" is selected by default, and that's what you want, so all you have to do is click the "Create" button (or simply hit the Enter key on your keyboard).
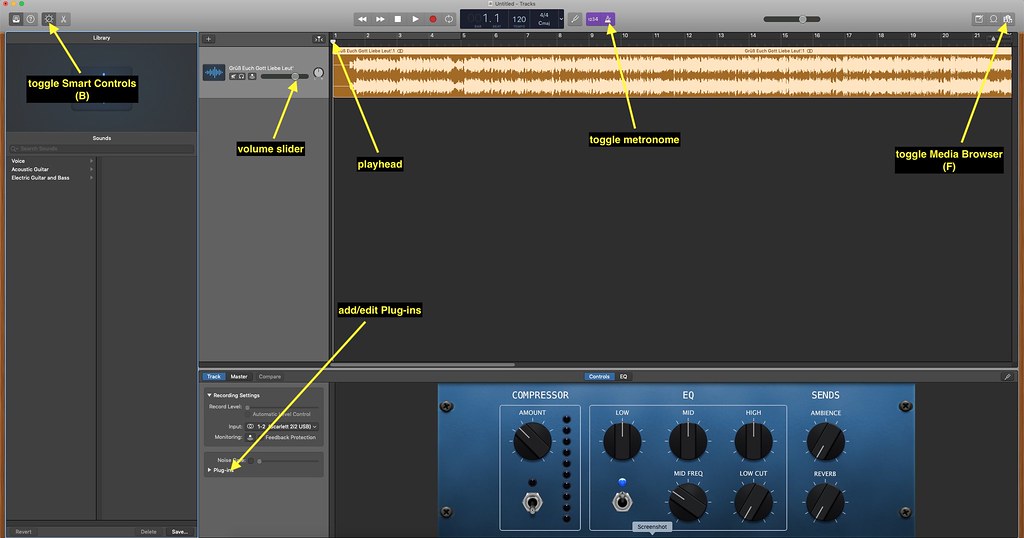
3. You'll now see the project with the empty audio track you just created. By default, the metronome is on, and you won't want to hear that during playback, so click on it to toggle it off.
4. Then either:
A. Open Finder and navigate to where the mp3 (or other audio format) file that you want to work with is located. Then simply drag and drop that file onto the track.
B. If the audio file you want is in your iTunes library, click on the Media Browser button at the top right of the project window (or press the F key on your keyboard) and you can browse/search for the file there and drag it onto the track.
5. You'll now see the audio waveform in the track, and you are now ready to work with the audio.
Note: Click the following image to see full-size.
6. Basic Edits
7. Export the audio to a new mp3 file (or whatever format you choose) when you're satisfied with the results by going in the menu bar to Share > Export Song to Disk.
Obviously, a ton more could be said, but those are the basics. Apple has an online user guide here and sometimes the best tutorial is to play around with the software on your own. Hope that helps!
(tl;dr: Open GarageBand, click "Choose", click "Create", drag audio file onto track, have fun editing)
1. Open Garageband. You'll see this window:
"Empty Project" is selected by default, and that's what you want, so all you have to do is click the "Choose" button (or simply hit the Enter key on your keyboard).
2. You'll now see the project with another window prompting you to choose a track type. "Record using a microphone or line input -- or drag and drop audio files" is selected by default, and that's what you want, so all you have to do is click the "Create" button (or simply hit the Enter key on your keyboard).
3. You'll now see the project with the empty audio track you just created. By default, the metronome is on, and you won't want to hear that during playback, so click on it to toggle it off.
4. Then either:
A. Open Finder and navigate to where the mp3 (or other audio format) file that you want to work with is located. Then simply drag and drop that file onto the track.
B. If the audio file you want is in your iTunes library, click on the Media Browser button at the top right of the project window (or press the F key on your keyboard) and you can browse/search for the file there and drag it onto the track.
5. You'll now see the audio waveform in the track, and you are now ready to work with the audio.
Note: Click the following image to see full-size.

6. Basic Edits
A. To adjust the track's volume, simply drag the volume slider back and forth.
B. To trim the audio clip (for example, if you have dead air or white noise at the beginning or end of the audio), simply move the playhead to the spot in the audio you want to trim at, then press CMD + T (or in the menu bar: Edit > Split Regions at Playhead). Now click on the region you want to delete (you'll know it's selected when the "bar" at the top of the region is the same color as the audio waveform) and simply press the delete key on your keyboard. To move the remaining region to the beginning of the track, simply click the top of the region and drag it over to the left.
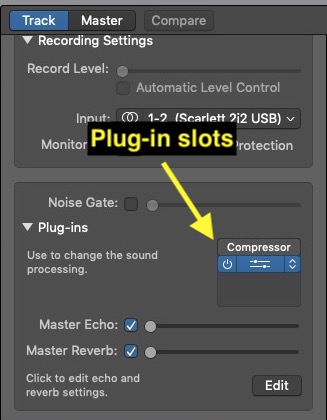
C. To add plugins, such as EQ, compression, or reverb, click on Plug-ins down in the Smart Controls section at the bottom of the project window. If you don't see this section, simply press B on your keyboard. You'll see slots for 4 plugins, and Compressor and Channel EQ are already in slots 1-2 by default (and Channel EQ is turned on--indicated by its blue color--by default, but the EQ settings are all set to flat). The actual "smart controls" (on-screen control knobs and switches that let you visually adjust the plug-in settings) are prominently displayed in the right section of this area. Notice when you hover your cursor over a plugin, you see it turns into 3 buttons: a power symbol (far left), sliders (middle), and up/down carets (right). Clicking the power symbol toggles the plug-in on or off; clicking the sliders symbol opens the plug-in's settings window; clicking the up/down carets lets you remove the plug-in or insert a new one in its place. When you open a plug-in's settings, there is a drop-down menu with preset settings for that plug-in, or of course you can adjust the settings manually.
B. To trim the audio clip (for example, if you have dead air or white noise at the beginning or end of the audio), simply move the playhead to the spot in the audio you want to trim at, then press CMD + T (or in the menu bar: Edit > Split Regions at Playhead). Now click on the region you want to delete (you'll know it's selected when the "bar" at the top of the region is the same color as the audio waveform) and simply press the delete key on your keyboard. To move the remaining region to the beginning of the track, simply click the top of the region and drag it over to the left.
Note: if you want to locate the playhead more precisely, drag the horizontal zoom slider to zoom in on the audio.
C. To add plugins, such as EQ, compression, or reverb, click on Plug-ins down in the Smart Controls section at the bottom of the project window. If you don't see this section, simply press B on your keyboard. You'll see slots for 4 plugins, and Compressor and Channel EQ are already in slots 1-2 by default (and Channel EQ is turned on--indicated by its blue color--by default, but the EQ settings are all set to flat). The actual "smart controls" (on-screen control knobs and switches that let you visually adjust the plug-in settings) are prominently displayed in the right section of this area. Notice when you hover your cursor over a plugin, you see it turns into 3 buttons: a power symbol (far left), sliders (middle), and up/down carets (right). Clicking the power symbol toggles the plug-in on or off; clicking the sliders symbol opens the plug-in's settings window; clicking the up/down carets lets you remove the plug-in or insert a new one in its place. When you open a plug-in's settings, there is a drop-down menu with preset settings for that plug-in, or of course you can adjust the settings manually.
7. Export the audio to a new mp3 file (or whatever format you choose) when you're satisfied with the results by going in the menu bar to Share > Export Song to Disk.
Obviously, a ton more could be said, but those are the basics. Apple has an online user guide here and sometimes the best tutorial is to play around with the software on your own. Hope that helps!
Last edited:
")

