OSX Lion Server Part 02 – Getting the Network Right

Here we’ll cover all the network configuration details that you’ll need to have in place to make sure the installation goes smoother later on. Whether your going for a local server or a full-on public server with its own domain name, it’s important to understand how the server communicates with your devices both inside your home or business and outside in the big wide world.
IP addresses – the network of numbers
You may know this stuff already, but I’ll briefly cover this subject anyhow, just in case the whole area of internet addresses has never been clearly explained.
Any computer, phone, Xbox or other device that can connect to the internet has an address that is a number, much like a zip code. There are two distinct types of these IP addresses.
Public IP numbers
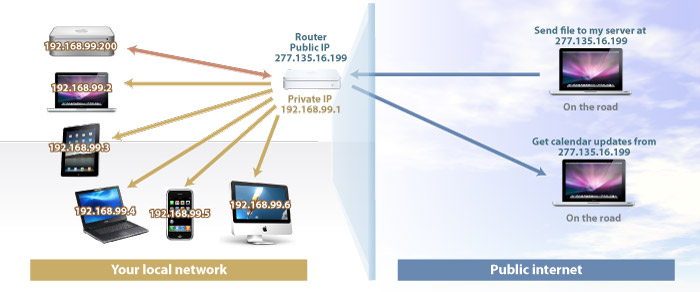
First is a public IP address, typically you’ll have just one of these, given out to you by the company that provides your internet connection (ISP). This is unique to you and the whole worldwide internet is told that any data sent to that number goes to you and nobody else.
In our example we’ll give our fictional business or home the public IP address of 277.135.16.199.
In most cases your internet router will have this public address assigned to it, but your router has to handle the many devices in your home or business, that’s where private IP addresses come in. They allow a number of devices behind one public IP address to connect to the internet and not clash with each other. Your router handles the switch between the public internet and your private network. Its a bit like an apartment complex or condo. It has one public address on the street and then a whole number of apartment numbers inside.
Private IP numbers
There are a range of IP addresses that are reserved for private networks and are never given out for public use. Typically these start with 192.168, your router will usually be set to to 192.168.0.1 or 192.168.1.1 and give out unique addresses in it’s range to all connected devices you have on your premises. Your router has the public internet address and uses something called network address translation (NAT) to figure out which bits of information coming to and from the internet are supposed to link to devices with private IP addresses inside your network. So your network will have a public IP address of 277.135.16.199, your router will also have a private address of 192.168.0.1 and will give out an address to one of your Macs of 192.168.0.6 – where the last digit, 6, is the next available address, since the router knows that 5 other devices (including the router) inside your network also have IP addresses.
The VPN clash
If you set up a local server or private server, and want to use a Virtual Private Network connection to access your own server securely from outside, then you may encounter the VPN clash.
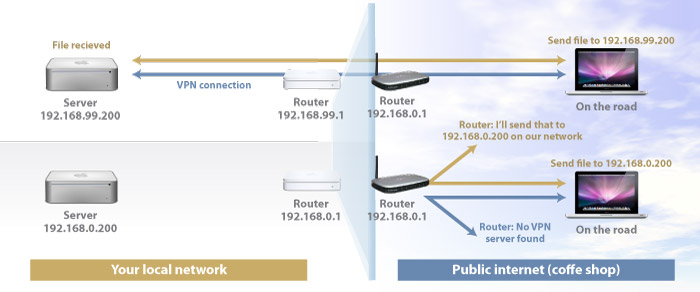
if you are setting up a Virtual Private network connection to your server then you’ll need to change the address range your own router gives out. This is because a VPN connection connects a device directly to your own network from outside (when you are in a coffee shop for example). Since most routers out there use either the 192.168.0.XXX or 192.168.1.XXX range, if your own router also uses one of these private address ranges, the connection will fail since the network you have set-up at home has the same private addresses as the network in a coffee shop. The coffee shop’s router will assume you are sending data to another device inside its network, rather than trying to connect over the internet back to your own network. You are basically sending messages to 192.168.0.200 at home while the coffee shop thinks you are trying to send data to 192.168.0.200 in the coffee shop.
So if you think you might be using VPN, then set your router to use something like 192.168.99.XXX, as long as that third number is not 0, 1 or 2 you should be good. You’ll have to consult your router’s help pages and do this bit yourself, and if you cannot find the relevant help pages on the manufacturers site or install disk, post on the Mac Forums and there will be someone who will be able to help. If you do opt to set up a new private IP address range, bear in mind that your connected devices will need to be updated with the changed address of your router to re-establish their internet connection.
If you don’t plan on using VPN, then there is no need to complete this step, but it can be set-up later if you change your mind. Setting up VPN on the server will be dealt with in detail in a later article in this series.
Domain names
One last thing before we start installing Lion Server, and this bit is essential to get set-up before we start if you want to set up a public server, and that’s getting a domain name.
The reason I discussed addresses is that you need to purchase a domain name and link it up to your public IP address. But there are two types of public IP address and that effects what we do when setting up a domain name.
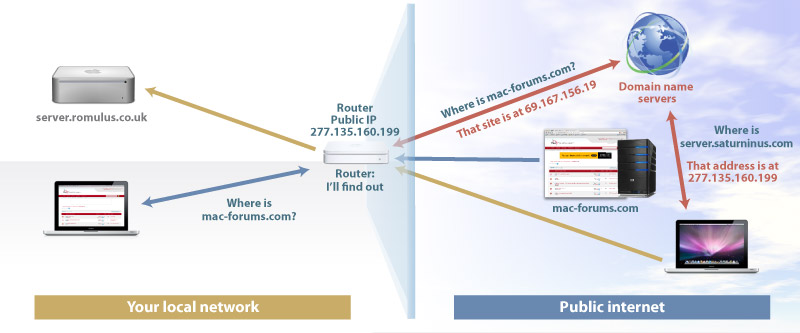
There’s an obvious reason why domain names are used on the internet. While computers like numbers, and the internet could quite happily work using IP numbers alone, us humans find remembering loads of numbers difficult. That is why IP numbers are linked to domain names for public services like websites. It’s easier to remember www.mac-forums.com than 69.167.156.19.
Static and dynamic IP addresses
If you are lucky, like me, your ISP has given you a static IP address, like 277.135.16.199. Typically business accounts from an ISP also get static IP addresses. When you buy a domain name you link it your public IP address so that setting up services can use a name like server.saturninus.com instead of 277.135.16.199.
If you want to find out your current IP address then simply go to this site http://www.whatismyip.com.
The tricky bit is that many ISPs give you a dynamic IP address. In this case, you are given an IP address from a pool of available numbers each time you log on to the ISP. Since most of us have routers that are always connected, that means the only time your dynamic IP address will change is if you reboot your router or the ISP does some maintenance and changes the network at their end. Either way, you could keep the same IP address for months, only to find that it has changed all of a sudden, and your domain has to be relinked to the new number.
Linking a Domain name to your static IP address
So, if you have a static IP address, you can register your domain name with any of the domain name providers out there and know the link is not going to change. If you are just after a domain, and don’t want to pay for webspace with a provider, then make sure the company lets you control where your purchased domain points to. Many hosting companies require that a domain you buy links to one of their web hosting packages, before you are allowed to relink the host name, so check this first. GoDaddy does offer control over a domain, without the need to purchase a web package. But, of course, there are plenty of other domain name providers out there.
So, now we have a domain name registered, server.saturninus.com, but I want the domain to point to my public IP address. The domain name register will provide you with a web based control panel where you can change what are called A records which are basically address records that will tell the internet’s domain name servers (DNS) to send any request for that name to your own public IP address.
Here’s the domain system for my provider. I have a domain section in their control panel and have set various A records to point to my public IP address. You will see there are various entries listed. I have added a subdomain called server and also pointed it to 277.135.16.199 since I am going to give my server the public domain name server.saturninus.com. This unique server domain name means I can control which services can be handled by Lion Server and which services, like mail or web, that I may want to leave to the ISP, or even a separate machine on my network.
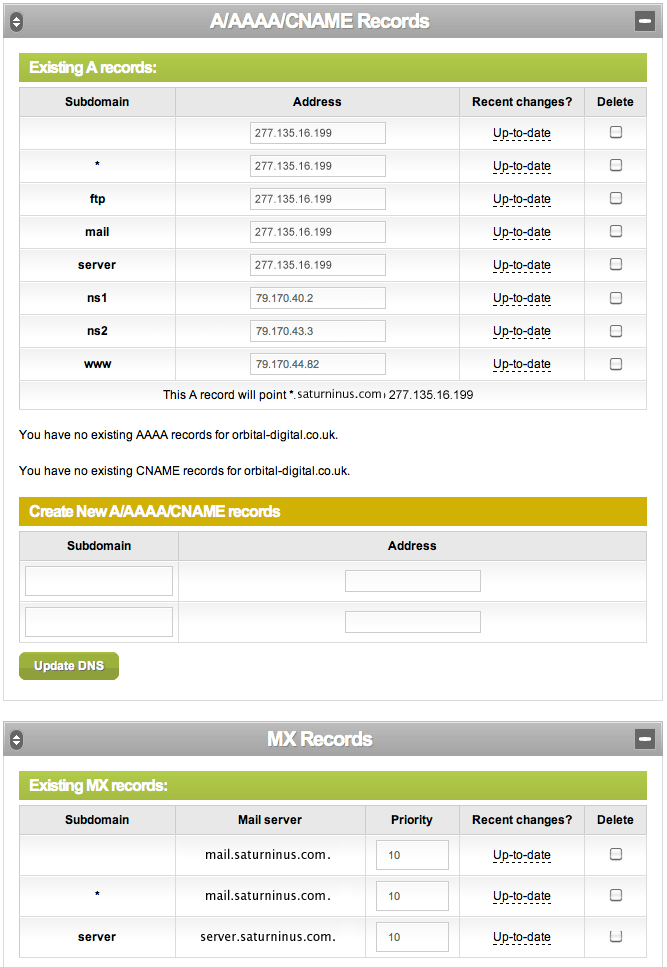
Once you change these A records, allow 24 hours for them to update, since every domain name server on the internet will need to be updated with the settings you have just altered, and that doesn’t happen instantly.
So that’s it. Now you have a fully qualified domain name on the internet, and the domain name servers also know where to send any traffic when any outside devices want to talk to your server inside your own network. Of course, if the Steinbeck family wanted to create a fully public server they would register the domain steinbecks-kansas.com and link that to their public IP address.
Linking a Domain name to your dynamic IP address
If you have a dynamic address, you can either keep an eye on your IP address and update it manually, or use a service like DynDNS. The manual method is not ideal, since when your dynamic IP address changes, you may not be aware, and your domain be offline for the duration it takes to update your address records (A records).
The solution for this is called dynamic DNS, a service provided by companies like DynDNS. They are able to register a domain for you and link it to your dynamic public IP address in real time. When you sign up for this service you are given a username and password to keep logged into their system and track your IP address with their servers.
There are two ways that DynDNS can keep track of your dynamic IP address and keep their servers up to date. You can get your router to keep your IP address up to date if your router supports this. Below are the setting entered into a Netgear router. If your router does not have this setting then use the second method.

The second method is to download the DynDNS app, which will keep in contact with DynDNS from any computer on your own network. This can be any Mac or PC, but for our server set-up, it might as well be the server itself.
So that’s the network set-up and ready to start the installation of Lion Server. We’ll soon begin the actual installation, but there’s one more step, and that’s configuring your router to pass Lion Server’s many services between the servers and the internet.