How does one get a battle hardened Macbook you might ask? Well, it's a tale of longevity and surviving nature (literally).
During my freshman year of college, I inherited said Macbook in an already battered state. When I got it, the battery was grotesquely swollen, the hard drive shot, and it was filthy. The story behind it was that it had been stolen from my friend, dumped in some bushes in a rain storm, recovered, and considered shot. My friend received a new Macbook, compliments of the thief's bank account, but his old Macbook just sat in a dusty corner. I asked him if I could keep it if I was able to fix it. He agreed, and one $60 battery and one $60 100GB hard drive later, I had myself a Macbook.
This refurbished Macbook lasted several curious disassemblies, a few drops and bangs, but still kept chugging. About a year after I got it, it was left open and took an AirSoft pellet to the face, spreading a beautiful blue/black/white bruise across the screen. Later that summer, I bought a new screen and replaced it. This lasted for another year of casual scrapes, bumps, and bruises until it finally quit on me last summer (2009). The culprit? The port on the logic board supplying power to the backlight inverter board was completely shot. Pretty much no way to repair it now. I bought myself a new Macbook and the old one sat in a bin looking like C3PO after Chewie found him. Until now that is, when I figured out how to put C3PO's head on the right way.
At the beginning of the summer (couple of weeks ago), I started fiddling with the old Macbook again. I had since sold off the hard drive and Superdrive to other needy Macheads and the keyboard/trackpad had somehow stopped working. Nonetheless, I was determined to get this thing working in some way. My goal was a media center that I could tuck out of site, essentially a Mac mini. But I wanted to spend little to no money and I wanted to do it myself.
I'm writing the first part of this build log retrospectively, so no pictures of me crying or videos of me creatively stringing curse words together will follow
Day 1 - May 23rd
I pulled out all the parts I had laying around and got it to actually start up for the first time in probably months. I was confused though because I hit the power button on the keyboard which turned it on, but then I couldn't boot into target disk mode or any other options. After awhile, I learned that there's an Apple failsafe that causes the computer to power on if there is AC power but no battery. My pressing the power button was just monkey work. The brilliant idea of just installing the hard drive in my current Macbook and installing Snow Leopard finally dawned on me then, after hours of head scratching. So into the wee hours of the morning the progress bar... progressed.
During the time it took to install (would it surprise you to know that a fresh install of Leopard goes faster than an update of a clean system to Snow Leopard?), I tried to figure out what I could get away with removing from the old Macbook. I plugged the hard drive from my current Macbook into the old one and via my mini-DVI to DVI to HDMI adapter, I was able to output video to my 27" HDTV. Herein lay one of my first big problems: even though I had removed the Macbook's LCD screen, OS X believed it was still there. So by default, the screens were extensions of one another, with the menu bar being on the nonexistent LCD screen. I managed to get into the display preferences by right-clicking on the desktop, opening "Change Desktop Background" and then guessing where I was clicking and dragging on the phantom monitor to get the main Desktop preference pane I wanted. From there I hit Show All and was able to get to the Display preference pane, where I set up mirrored displays. Awesome right? Too bad I did this on the hard drive for my current Mac, not the one that would soon find its way into the Mac veteran. Oh well. Practice makes perfect. Snow Leopard was finally done installing, so I was off to a lovely Macnap.
Day 2 - May 24th
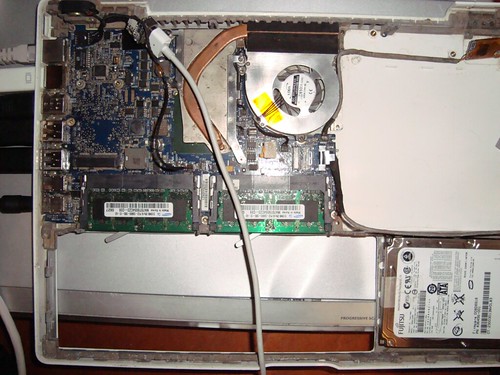
Now that I knew that the computer worked, I started to see what components I could pull out and keep the computer running. To get it to boot up and fill my heart with that wondrous "BAAHNG", I found (through much trial and error and many words NSFW) that only three components were required besides the logic board (four if you include the internal speaker to hear the BAAHNG). RAM was a must (I had 1 GB that was already in mine), a HDD was necessary running some kind of operating system, and the heatsink/fan complex needed to be hooked up (all three plugs: the two temperature sensors and the fan power). Once I attached the MagSafe adapter, the computer whizzed right up. After some more trial and error (those pesky things are very sensitive and seem to take things personally), I decided on just keeping the Bluetooth in there for the time being. Originally, I included the Airport card, but I had some difficulties with the antennae so I just opted for wired Ethernet. I already had a wireless USB mouse/keyboard combo, so I used that for input. The Firewire port was filled with my 1TB external drive. Audio out went to my TV, and the second USB port was later equipped with an Xbox 360 controller for emulation glory Now, I was finally getting an image of what I wanted my MediaCenterMac to look like.
This photograph is what it currently looks like, sitting underneath my television in all its exposed glory.
Day 3 - May 25th
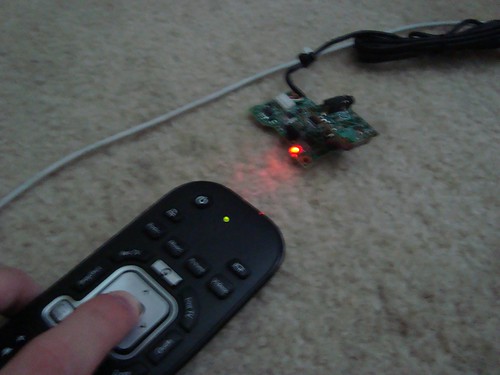
I wasted the majority of this day trying to get a third-party HP Media Center IR remote to work with its matching IR receiver (I never got an Apple remote with either Macbook and the internal IR receiver broke ages ago). I tried everything from Remote Buddy to LIRC. Nothing worked. I know that I could use my iPod touch as a remote, but I don't like having to wait for it to wake up to use it as a remote. I want something that's a pick up and go solution where I can remap the keys as I see fit. But no, the stupid red LED on the receiver just sat there and winked me as I mashed buttons in fury. The one viable alternative that I see is perhaps purchasing a PS3 BT remote. But that would cost money. And I'm trying to not spend much money on this project.
The Next Four Days - May 26th - 30th
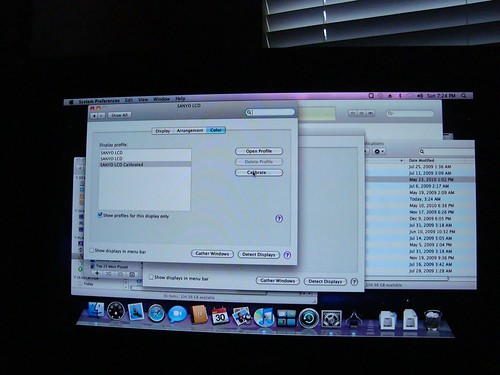
During this time, I tweaked the software and visuals on the TV output. I got the colors looking fairly decent on the screen using Apple's ColorSync. It delivers fairly crisp colors for a sub-$500 TV (circa 2006). I installed Boxee a few days ago as my main media center program and I like it for the most part. Netflix integration is a definite plus. I also set up a MadCatz Xbox 360 controller for use with emulators so I can enjoy the luxury of classic video games from my couch. Still working on other software things.
What The Future Looks Like
This is my vision for what this project will look like (visual mockups coming at some point in the future):
So basically, I need some feedback on my ideas and some help with my biggest problems for now: IR remote and the whole phantom monitor thingy where the computer thinks there's two monitors but there's only one. Any warnings or suggestions are welcome too.
During my freshman year of college, I inherited said Macbook in an already battered state. When I got it, the battery was grotesquely swollen, the hard drive shot, and it was filthy. The story behind it was that it had been stolen from my friend, dumped in some bushes in a rain storm, recovered, and considered shot. My friend received a new Macbook, compliments of the thief's bank account, but his old Macbook just sat in a dusty corner. I asked him if I could keep it if I was able to fix it. He agreed, and one $60 battery and one $60 100GB hard drive later, I had myself a Macbook.
This refurbished Macbook lasted several curious disassemblies, a few drops and bangs, but still kept chugging. About a year after I got it, it was left open and took an AirSoft pellet to the face, spreading a beautiful blue/black/white bruise across the screen. Later that summer, I bought a new screen and replaced it. This lasted for another year of casual scrapes, bumps, and bruises until it finally quit on me last summer (2009). The culprit? The port on the logic board supplying power to the backlight inverter board was completely shot. Pretty much no way to repair it now. I bought myself a new Macbook and the old one sat in a bin looking like C3PO after Chewie found him. Until now that is, when I figured out how to put C3PO's head on the right way.
At the beginning of the summer (couple of weeks ago), I started fiddling with the old Macbook again. I had since sold off the hard drive and Superdrive to other needy Macheads and the keyboard/trackpad had somehow stopped working. Nonetheless, I was determined to get this thing working in some way. My goal was a media center that I could tuck out of site, essentially a Mac mini. But I wanted to spend little to no money and I wanted to do it myself.
I'm writing the first part of this build log retrospectively, so no pictures of me crying or videos of me creatively stringing curse words together will follow
Day 1 - May 23rd
I pulled out all the parts I had laying around and got it to actually start up for the first time in probably months. I was confused though because I hit the power button on the keyboard which turned it on, but then I couldn't boot into target disk mode or any other options. After awhile, I learned that there's an Apple failsafe that causes the computer to power on if there is AC power but no battery. My pressing the power button was just monkey work. The brilliant idea of just installing the hard drive in my current Macbook and installing Snow Leopard finally dawned on me then, after hours of head scratching. So into the wee hours of the morning the progress bar... progressed.
During the time it took to install (would it surprise you to know that a fresh install of Leopard goes faster than an update of a clean system to Snow Leopard?), I tried to figure out what I could get away with removing from the old Macbook. I plugged the hard drive from my current Macbook into the old one and via my mini-DVI to DVI to HDMI adapter, I was able to output video to my 27" HDTV. Herein lay one of my first big problems: even though I had removed the Macbook's LCD screen, OS X believed it was still there. So by default, the screens were extensions of one another, with the menu bar being on the nonexistent LCD screen. I managed to get into the display preferences by right-clicking on the desktop, opening "Change Desktop Background" and then guessing where I was clicking and dragging on the phantom monitor to get the main Desktop preference pane I wanted. From there I hit Show All and was able to get to the Display preference pane, where I set up mirrored displays. Awesome right? Too bad I did this on the hard drive for my current Mac, not the one that would soon find its way into the Mac veteran. Oh well. Practice makes perfect. Snow Leopard was finally done installing, so I was off to a lovely Macnap.
Day 2 - May 24th
Now that I knew that the computer worked, I started to see what components I could pull out and keep the computer running. To get it to boot up and fill my heart with that wondrous "BAAHNG", I found (through much trial and error and many words NSFW) that only three components were required besides the logic board (four if you include the internal speaker to hear the BAAHNG). RAM was a must (I had 1 GB that was already in mine), a HDD was necessary running some kind of operating system, and the heatsink/fan complex needed to be hooked up (all three plugs: the two temperature sensors and the fan power). Once I attached the MagSafe adapter, the computer whizzed right up. After some more trial and error (those pesky things are very sensitive and seem to take things personally), I decided on just keeping the Bluetooth in there for the time being. Originally, I included the Airport card, but I had some difficulties with the antennae so I just opted for wired Ethernet. I already had a wireless USB mouse/keyboard combo, so I used that for input. The Firewire port was filled with my 1TB external drive. Audio out went to my TV, and the second USB port was later equipped with an Xbox 360 controller for emulation glory
Now, I was finally getting an image of what I wanted my MediaCenterMac to look like.This photograph is what it currently looks like, sitting underneath my television in all its exposed glory.
Day 3 - May 25th
I wasted the majority of this day trying to get a third-party HP Media Center IR remote to work with its matching IR receiver (I never got an Apple remote with either Macbook and the internal IR receiver broke ages ago). I tried everything from Remote Buddy to LIRC. Nothing worked. I know that I could use my iPod touch as a remote, but I don't like having to wait for it to wake up to use it as a remote. I want something that's a pick up and go solution where I can remap the keys as I see fit. But no, the stupid red LED on the receiver just sat there and winked me as I mashed buttons in fury. The one viable alternative that I see is perhaps purchasing a PS3 BT remote. But that would cost money. And I'm trying to not spend much money on this project.
The Next Four Days - May 26th - 30th
During this time, I tweaked the software and visuals on the TV output. I got the colors looking fairly decent on the screen using Apple's ColorSync. It delivers fairly crisp colors for a sub-$500 TV (circa 2006). I installed Boxee a few days ago as my main media center program and I like it for the most part. Netflix integration is a definite plus. I also set up a MadCatz Xbox 360 controller for use with emulators so I can enjoy the luxury of classic video games from my couch. Still working on other software things.
What The Future Looks Like
This is my vision for what this project will look like (visual mockups coming at some point in the future):
- Design and build a black aluminum or acrylic enclosure with room for the logic board, BT module, HDD, USB keyboard/mouse wireless receiver (maybe I'll just opt for BT), and adequate cooling.
- The enclosure will be capable of being attached to the mounting bracket found on the back of almost every HDTV set.
- More USB ports? Maybe utilize the internal ones?
- Ability to be moved from one room/house/city/state/country (no TSA, it's just a black box...) to another with simplicity.
- Some kind of power button integration.
- Install Airport card and set up antenna properly for use at places without wired ethernet.
- Fix the darn Apple DVI adapter!! Everytime I move it, even a fraction of an inch, it messes up the output. Probably just need to buy a new one.
- Most people have HDMI right? So maybe I should make an HDMI port available via the Apple adapter and some 3rd party ones. It'd be nice to integrate it into the enclosure.
- Some solution to the internal monitor issue... OS X still thinks that the internal LCD screen is attached, when it is non-existent. When I turn the TV off, I have to replug the adapter cable in when I turn it back on. Basically, I want to be able to leave the computer on, turn the screen off, come back later and turn the screen on and find myself looking at the same screen.
So basically, I need some feedback on my ideas and some help with my biggest problems for now: IR remote and the whole phantom monitor thingy where the computer thinks there's two monitors but there's only one. Any warnings or suggestions are welcome too.

