Installed VirtualBox, would like to install OS, but lacking BOOTABLE CD/DVD drive

Joined
Jan 23, 2010
Messages
53
Reaction score
0
Points
6
Your Mac's Specs
MacBook Air / 1.86GHz / 2 GB / Version 10.6.2
Hi,

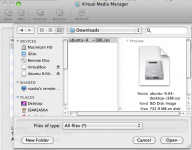
I just installed VirtualBox for Mac OS. Problem is, I don't have bootable CD/DVD drive. Is there a Mac utility that allows ISO images to be burnt onto USB drives?

Or, is there a way I can remotely access a bootable CD/DVD drive on my other laptop, which shares the same home network?
 

vansmith

Senior Member
Joined
Oct 19, 2008
Messages
19,924
Reaction score
559
Points
113
Location
Queensland
Your Mac's Specs
Mini (2014, 2018, 2020), MBA (2020), iPad Pro (2018), iPhone 13 Pro Max, Watch (S6)
You don't need a physical CD/DVD if you're using VirtualBox - you can tell VB to boot from the image:

1. Click your VM from the list on the left > Settings > Storage.
2. Click the picture of a CD on the left.
3. Click the folder with the green arrow in the "Attributes" section.
4. Click Add > navigate to the directory of the ISO and double click it.
5. Select your image in the list and click OK. Click OK in the Settings window.

Your VM is now set to boot from the ISO image. Click start and enjoy!
 
OP
jhoomjhoom
Joined
Jan 23, 2010
Messages
53
Reaction score
0
Points
6
Your Mac's Specs
MacBook Air / 1.86GHz / 2 GB / Version 10.6.2
Good Morning,

I tried the steps, and am running into problems. Attached are screen shots as I try to go through the steps - I spent a great deal of time learning how to do screen shots in Mac, so I really appreciate your patience and understanding.

01 - Downloading Ubuntu iso.png shows the Ubuntu ISO downloading

02 - Contents of Ubuntu ISO.png shows the contents of Ubuntu ISO

03 - Click on Storage.png shows the link to Storage

04 - Click on folder with green arrow.png shows the link to the green folder

05 - Click Add.png is where I click "Add"

I have more screenshots, which I will post in continuatioin

01 - Downloading Ubuntu iso.png

03 - Click on Storage.png

04 - Click on folder with green arrow.png

05 - Click Add.png
 

Attachments

  • 02 - Contents of Ubuntu ISO.png
    02 - Contents of Ubuntu ISO.png
    48 KB · Views: 10

vansmith

Senior Member
Joined
Oct 19, 2008
Messages
19,924
Reaction score
559
Points
113
Location
Queensland
Your Mac's Specs
Mini (2014, 2018, 2020), MBA (2020), iPad Pro (2018), iPhone 13 Pro Max, Watch (S6)
You forgot to click on the CD in the storage tree and you instead clicked on the HD. In picture 4, you need to click on the CD (it says "Empty"). From here, continue on with the steps in my first post.
 
OP
jhoomjhoom
Joined
Jan 23, 2010
Messages
53
Reaction score
0
Points
6
Your Mac's Specs
MacBook Air / 1.86GHz / 2 GB / Version 10.6.2
Below are the remaining steps:

06 - Go to Downloads directory.png shows I went to Downloads directory where the Ubuntu ISO has been downloaded to

07 - Specify all files.png shows that I specified "All files" since ISO is not listed as an option

08 - Click Open and get error.png shows the error message I get


Please advise

06 - Go to Downloads directory.png

08 - Click Open and get error.png
 

Attachments

  • 07 - Specify all files.png
    07 - Specify all files.png
    91.6 KB · Views: 7
OP
jhoomjhoom
Joined
Jan 23, 2010
Messages
53
Reaction score
0
Points
6
Your Mac's Specs
MacBook Air / 1.86GHz / 2 GB / Version 10.6.2
You forgot to click on the CD in the storage tree and you instead clicked on the HD. In picture 4, you need to click on the CD (it says "Empty"). From here, continue on with the steps in my first post.


I posted my last reply before reading your reply ;P

I'll try it out and keep you updated
 

dtravis7


Retired Staff
Joined
Jan 4, 2005
Messages
30,133
Reaction score
703
Points
113
Location
Modesto, Ca.
Your Mac's Specs
MacMini M-1 MacOS Monterey, iMac 2010 27"Quad I7 , MBPLate2011, iPad Pro10.5", iPhoneSE
For sure post if that works as later today I am going to either install Ubuntu or Open Suse in Virtual Box. Did Chrome OS and it works fine (for Chrome anyway!). :D
 

vansmith

Senior Member
Joined
Oct 19, 2008
Messages
19,924
Reaction score
559
Points
113
Location
Queensland
Your Mac's Specs
Mini (2014, 2018, 2020), MBA (2020), iPad Pro (2018), iPhone 13 Pro Max, Watch (S6)
In case you get stuck, take a look at this screenshot I made. You need to click on "1" and then on "2" (that will make sense once you view the picture). From your screenshots, you seem to have forgotten step 1.
 
OP
jhoomjhoom
Joined
Jan 23, 2010
Messages
53
Reaction score
0
Points
6
Your Mac's Specs
MacBook Air / 1.86GHz / 2 GB / Version 10.6.2
Hi,

Thanks!

After your guidance, I am now able to load Ubuntu onto my VM.

There are still some hurdles:

1. It takes about five minutes for Ubuntu to load, as opposed to several seconds like it has been designed to. Also, in the first few seconds of loading it displays a message along the lines of, "Unable to allocate resources", but continues to load anyway.

2. To enlarge the screen size of the VM, it is advised to go to to the top navigation bar, click on Devices -> Install Guest Additions (as discussed in [ubuntu] How to increase screen sice of Sun VirtualBox - Ubuntu Forums). However, I get an error doing so (Error when attempting to load guest additions.png)

3. When I shut down Ubuntu I get a message to remove the disk and press Enter, for which I do (Unmount Disk.png). But why is VBoxGuestAddition.iso an option when i keep getting errors, as explained in step 2?

4. If i want to reboot Ubuntu, I get the the error shown in Error when booting up.png. The only work-around I found to this is to go to settings -> storage -> click on Empty -> click on folder with green arrow -> and then select the ISO image. But again, why is VBoxGuestAddition.iso an option (Virtual Media Manager.png)

Please address these points. Your help is really appreciated.

Error when attempting to load guest additions.png

Unmount Disk.png

Error when booting up.png

Virtual Media Manager.png
 

vansmith

Senior Member
Joined
Oct 19, 2008
Messages
19,924
Reaction score
559
Points
113
Location
Queensland
Your Mac's Specs
Mini (2014, 2018, 2020), MBA (2020), iPad Pro (2018), iPhone 13 Pro Max, Watch (S6)
Are you trying to boot from the guest additions? You need to boot from the Ubuntu ISO. Also, from your first picture, it looks as if you are trying to install the guest additions while running from the image/live CD. You need to install Ubuntu first and then install the guest additions.

Boot from the Ubuntu ISO, install it and then install the guest additions. Don't worry about the errors during boot - if it boots and it works, you're on the right track. As for your "no bootable medium found" error, as I alluded to earlier, you're trying to boot from an image that isn't meant to be booted from. My guess is that if you go to the storage settings, you'll see that your VM is trying to boot from something else (mostly like the guest additions).

As for the speed, realize that you are virtualizing Ubuntu - you are trying to boot an OS through a program running on an OS. You are in essence running two OSes at the same time. You can't expect near native performance when you virtualize an OS.
 
OP
jhoomjhoom
Joined
Jan 23, 2010
Messages
53
Reaction score
0
Points
6
Your Mac's Specs
MacBook Air / 1.86GHz / 2 GB / Version 10.6.2
Are you trying to boot from the guest additions? You need to boot from the Ubuntu ISO. Also, from your first picture, it looks as if you are trying to install the guest additions while running from the image/live CD.

My intention was to boot from Ubuntu ISO. To avoid possible software conflict, I restarted my Mac and deleted the guest additions and then booted my VM.


You need to install Ubuntu first and then install the guest additions.

I thought that actually installing software, such as Ubuntu, and guest additions will change the host computer, i.e. the Mac. I'm currently studying programming and am concerned about making any permanent changes to the Mac, hence my need for using VM.

Please explain
 

vansmith

Senior Member
Joined
Oct 19, 2008
Messages
19,924
Reaction score
559
Points
113
Location
Queensland
Your Mac's Specs
Mini (2014, 2018, 2020), MBA (2020), iPad Pro (2018), iPhone 13 Pro Max, Watch (S6)
When you setup your VM, you also made a virtual hard disk. That virtual hard disk is actually just a file. If you go to ~/Library/VirtualBox/HardDisks/ (~ = user directory), you should see at least one file named <something>.vdi. The vdi files are your "hard disks". For instance, my Gentoo hard disk is called Gentoo.vdi and is 3.21 GB. What I'm getting at is the vdi file is the "hard drive" for your VM. So, when you created the Ubuntu VM, you should have told it to create a virtual hard disk of a certain size. That virtual hard disk, listed as a vdi file in your HardDisks folder, is the hard drive. Think of it this way (I fear I may have lost you): the hard drive for your VM is a file. Therefore, when you install an OS, you're just manipulating that one file which acts like your hard disk.
My intention was to boot from Ubuntu ISO. To avoid possible software conflict, I restarted my Mac and deleted the guest additions and then booted my VM.
You didn't delete them from your computer did you? I'll assume that you only removed it from the virtual media manager.
 
OP
jhoomjhoom
Joined
Jan 23, 2010
Messages
53
Reaction score
0
Points
6
Your Mac's Specs
MacBook Air / 1.86GHz / 2 GB / Version 10.6.2
When you setup your VM, you also made a virtual hard disk. That virtual hard disk is actually just a file. If you go to ~/Library/VirtualBox/HardDisks/ (~ = user directory), you should see at least one file named <something>.vdi. The vdi files are your "hard disks". For instance, my Gentoo hard disk is called Gentoo.vdi and is 3.21 GB. What I'm getting at is the vdi file is the "hard drive" for your VM. So, when you created the Ubuntu VM, you should have told it to create a virtual hard disk of a certain size. That virtual hard disk, listed as a vdi file in your HardDisks folder, is the hard drive. Think of it this way (I fear I may have lost you): the hard drive for your VM is a file. Therefore, when you install an OS, you're just manipulating that one file which acts like your hard disk.
You didn't delete them from your computer did you? I'll assume that you only removed it from the virtual media manager.

I think I understand what you are explaining - I'd need to make sure the .vdi doesn't take up too much space on my Mac's hard drive.

As for the guest additions, I clicked on the button "Remove" - I'm not sure how I'd delete it.

I'll work on having the ISO installed and let you know how it goes.

Thank you!
 

chscag

Well-known member
Staff member
Admin
Joined
Jan 23, 2008
Messages
65,248
Reaction score
1,833
Points
113
Location
Keller, Texas
Your Mac's Specs
2017 27" iMac, 10.5" iPad Pro, iPhone 8, iPhone 11, iPhone 12 Mini, Numerous iPods, Monterey
Van:

Great explanations. Even I could follow them. :Blushing:

Regards.
 

vansmith

Senior Member
Joined
Oct 19, 2008
Messages
19,924
Reaction score
559
Points
113
Location
Queensland
Your Mac's Specs
Mini (2014, 2018, 2020), MBA (2020), iPad Pro (2018), iPhone 13 Pro Max, Watch (S6)
I think I understand what you are explaining - I'd need to make sure the .vdi doesn't take up too much space on my Mac's hard drive.
The best way to do that in my opinion is to create a "Dynamically expanding" HD as opposed to "Fixed-size" when creating your HD. Dynamically expanding ones will only grow as they are needed as opposed to fixed-size which will create a huge file. For example, let's say you want an 8GB virtual HD. A dynamically expanding virtual HD will start out as a few KB and grow in size until it reaches 8GB (yoru VM will see it as an 8GB HD all the time though). If you create a fixed-size, the file will be 8GB all the time - right after it is created, it will be 8GB. You can therefore save space if you go with a dynamically expanding one.

Van:

Great explanations. Even I could follow them. :Blushing:

Regards.
Thank you. :)
 
OP
jhoomjhoom
Joined
Jan 23, 2010
Messages
53
Reaction score
0
Points
6
Your Mac's Specs
MacBook Air / 1.86GHz / 2 GB / Version 10.6.2
Awesome, it now works!
 

Shop Amazon


Shop for your Apple, Mac, iPhone and other computer products on Amazon.
We are a participant in the Amazon Services LLC Associates Program, an affiliate program designed to provide a means for us to earn fees by linking to Amazon and affiliated sites.
Top