- Joined
- May 20, 2008
- Messages
- 44,212
- Reaction score
- 1,424
- Points
- 113
- Location
- U.S.
- Your Mac's Specs
- 2017 15" MBP, 16gig ram, 1TB SSD, OS 10.15
So a few nights ago I picked up an Early 2011 13" MacBook Pro for a very good price. This will be a replacement for my white 2008 MacBook!")
The 2011 13" MBP wasn't perfect...it did have:
- A couple very small dings in the aluminum body (no biggie).
- It looked like it had been dropped at least once...maybe twice. Both of the corners near the display hinge showed some impact damage.
- The ethernet port opening is a bit misshapen. But an ethernet plug still fits fine...I'll probably hardly used it anyway.
- The display had a very noticable amount of "free-play" in it when you opened, closed, or adjusted the display angle. Not a big deal...but irritating.
So I proceeded to check out the iFixit.com procedure for correcting this. Unfortunately...the best iFixit.com does is explain how to remove the display from the computer...iFixit.com does not explain how to correct the display free-play problem.
Here's the iFixit.com procedure for removing the display from the laptop:
MacBook Pro 13" Unibody Early 2011 Repair - iFixit
On I think just about every UniBody MacBook or MacBook Pro...the hinge area of the display has that black plastic piece. It's this black plastic piece that needs to be removed next.
With the display removed...the black plastic piece slides about 3/4ths of an inch (18-20mm) to the side...then it can be carefully lifted off...exposing a number of cables (video, camera, etc.)...and some adjustment screws for the display hinge. Sorry...I didn't take a photo of this...but below are two photos that show all of the adjustment/mounting screws for the display (with the black plastic hinge cover removed):
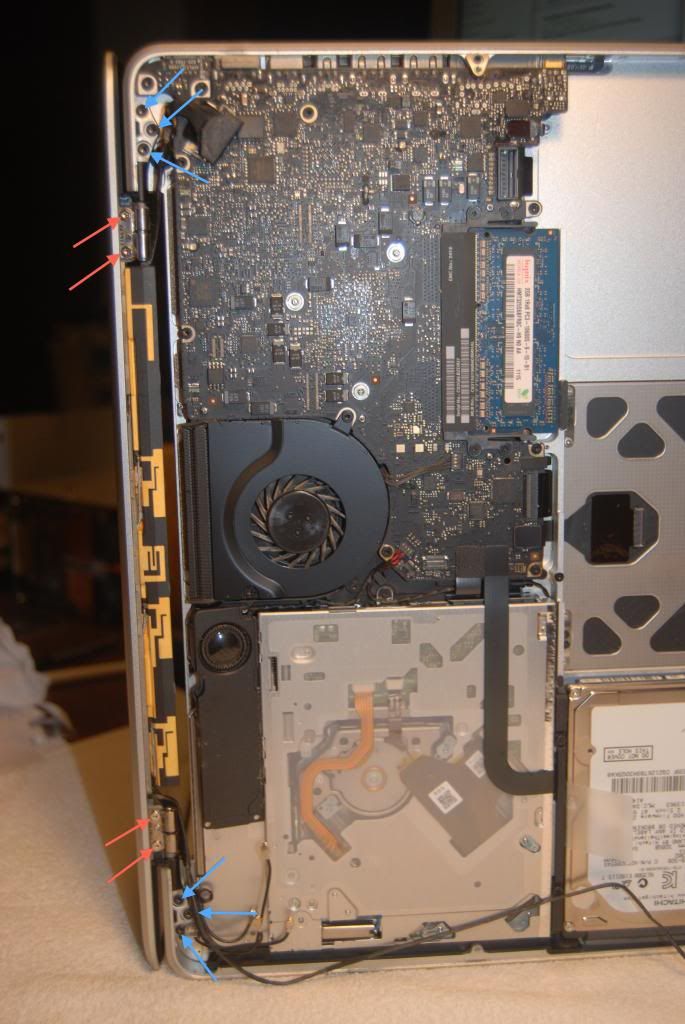
In this first photo (above)...there are a total of 6 screws (blue arrows) that mount the whole display assembly to the rest of the computer . There are also a total of 4 screws (red arrows) that mount the clutch assembly/hinge to the display itself.
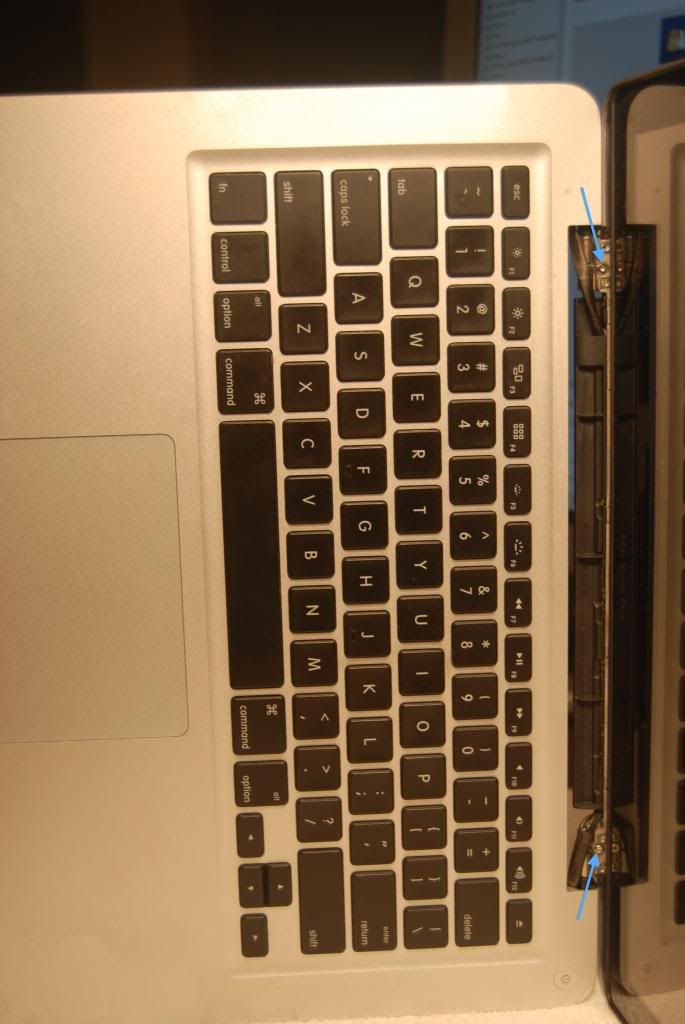
In the 2nd photo (above)...there are two more adjustment screws (also part of the clutch assembly/hinge) that is also part of the display when removed.
All 12 screws (blue & red) need to be checked for tightness to remove all free-play from the display. I tightened them all up...the free-play is gone..and I'm very pleased!
- Nick
p.s. I wanted to mention...I had the display reattached to the computer (without the black plastic piece attached that normally covers the hinge area)...because due to the computer being dropped 1-2 times...I was having some alignment & closure problems with the display...so I was playing with the alignment with everything together. The display still needs to be removed again...to reattach the black plastic hinge cover...and then everything put back together again.
p.s.s. I also wanted to mention that various other parts needed to be removed & cables detached to get access to all of the screws. All totally explained in the iFixit.com display removal procedure.
