
How to backup Intel restore DVDs to partition, and install off it, like a DVD
I cracked it!!! . I'm going to post a full and comprehensive tutorial when I have time, later this evening. Basically, you create a second partition on "Macintosh HD" (or use an external firewire drive/partition) and you rename this partition: "Mac OS X Install Disc 2" - making sure that the volume name is *exactly* as above, along with all UPPER/lower case letters - this is VITAL.
I'd say a firewire HDD is more convenient, but seeing as not everyone has one, a second partition on the INTERNAL HDD is a good way to go. Please note, I have spent 3 hours today, configuring this setup, and I have installed Tiger & all Bundled Apps (basically, EVERYTHING you get on the Intel C2D iMac restore DVDs!) roughly four times, and each time it installs seamlessly, and EVERY app is present, when finished.
On my Intel iMac 20 inch "Mac OS X Install Disc 2", there is a hidden file called '.discCookie'
which seems to be some form of XML file. This file (and possibly other files) look at the volume name of the drive from which the stuff on Disc 2 is being installed from, and expect it to be "Mac OS X Install Disc 2". Trust me on this, as I have installed seamlessly from start to end, calling the partition "Mac OS X Install Disc 2" - but when I renamed it to something else, the installer asked me to Insert Disc 2, halfway through, expecting the physical DVD media!.
In a nutshell, you create a partition or disk, internal OR external FWire, and call it "Mac OS X Install Disc 2" <--- spell it EXACTLY this way, or else!. Now, you insert "Mac OS X Install Disc 1" (first restore DVD) and using Disk Utility, restore the disk to the partition you just created (or disk!).
Next, you use "cocktail" application (google it) to enable viewing of hidden system files; having done this, you eject DVD1 and insert DVD2 of the restore DVD pair, and copy certain files and folders, onto the same partition. It really is THAT simple, **AND** it works!!
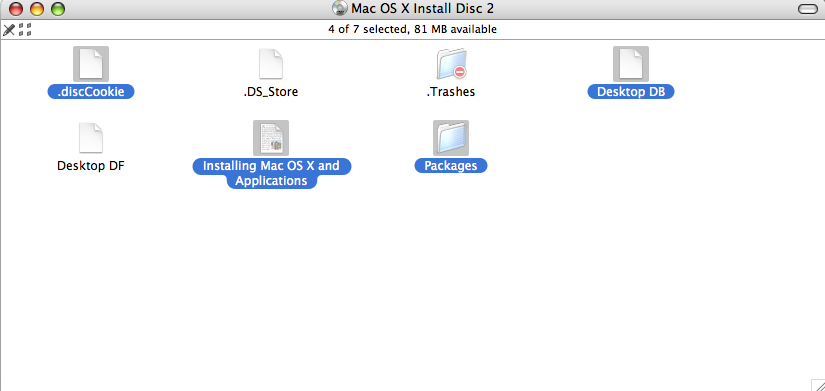
COPY THE FILES HIGHLIGHTED IN BLUE, FROM DVD 2, TO THE PARTITION, *AFTER* RESTORING DVD 1 TO THE PARTITION!
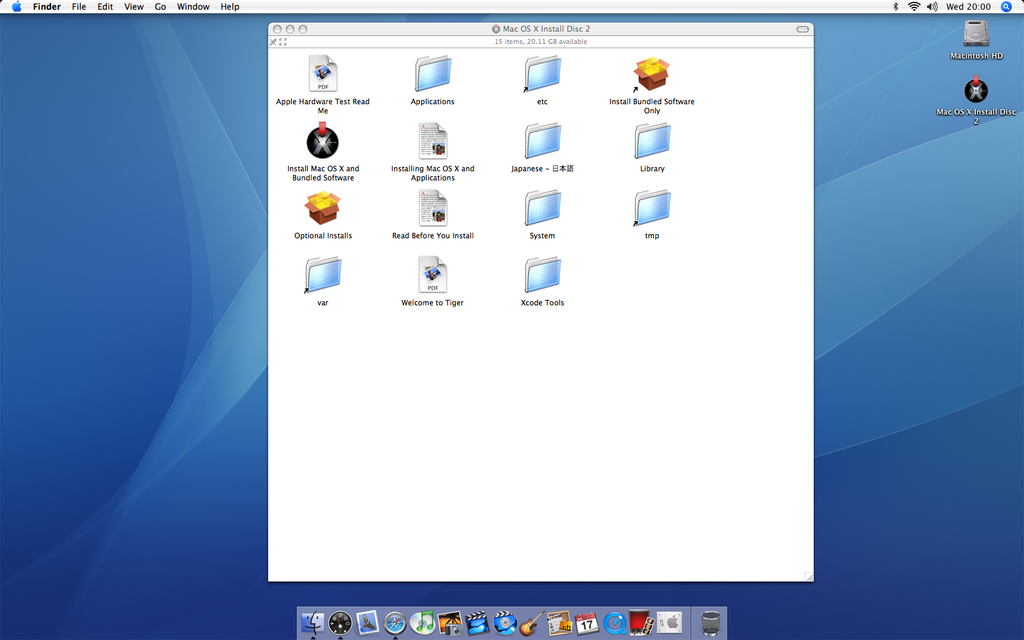
NOTICE ON THE TOP RIGHT OF MY DESKTOP, THE SECOND PARTITION, TO WHICH I HAVE RESTORED DVD 1, AND COPIED THE FILES AND FOLDERS SHOWN IN THE IMAGE ABOVE. THE FINDER WINDOW IN THE CENTRE OF THE SCREEN, IS THE FINISHED PRODUCT, AFTER RESTORING DVD 1 TO IT, AND COPYING THE FILES/FOLDERS FROM DVD 2
I shall write a full tutorial in time, but trust me - this saves scratching/damaging DVDs for which you have no replacement, AND it is blisteringly FFFFASSSTT!!. I have just installed EVERYTHING in 12 mins flat (from separate INTERNAL SATA2 partition on Macintosh HD).
I feel proud of my achievement!!
I don't think that is possible, because I believe you will need to alter the install code not to request the second install disk.
I cracked it!!!
. I'm going to post a full and comprehensive tutorial when I have time, later this evening. Basically, you create a second partition on "Macintosh HD" (or use an external firewire drive/partition) and you rename this partition: "Mac OS X Install Disc 2" - making sure that the volume name is *exactly* as above, along with all UPPER/lower case letters - this is VITAL.I'd say a firewire HDD is more convenient, but seeing as not everyone has one, a second partition on the INTERNAL HDD is a good way to go. Please note, I have spent 3 hours today, configuring this setup, and I have installed Tiger & all Bundled Apps (basically, EVERYTHING you get on the Intel C2D iMac restore DVDs!) roughly four times, and each time it installs seamlessly, and EVERY app is present, when finished.
On my Intel iMac 20 inch "Mac OS X Install Disc 2", there is a hidden file called '.discCookie'
which seems to be some form of XML file. This file (and possibly other files) look at the volume name of the drive from which the stuff on Disc 2 is being installed from, and expect it to be "Mac OS X Install Disc 2". Trust me on this, as I have installed seamlessly from start to end, calling the partition "Mac OS X Install Disc 2" - but when I renamed it to something else, the installer asked me to Insert Disc 2, halfway through, expecting the physical DVD media!.
In a nutshell, you create a partition or disk, internal OR external FWire, and call it "Mac OS X Install Disc 2" <--- spell it EXACTLY this way, or else!. Now, you insert "Mac OS X Install Disc 1" (first restore DVD) and using Disk Utility, restore the disk to the partition you just created (or disk!).
Next, you use "cocktail" application (google it) to enable viewing of hidden system files; having done this, you eject DVD1 and insert DVD2 of the restore DVD pair, and copy certain files and folders, onto the same partition. It really is THAT simple, **AND** it works!!
COPY THE FILES HIGHLIGHTED IN BLUE, FROM DVD 2, TO THE PARTITION, *AFTER* RESTORING DVD 1 TO THE PARTITION!
NOTICE ON THE TOP RIGHT OF MY DESKTOP, THE SECOND PARTITION, TO WHICH I HAVE RESTORED DVD 1, AND COPIED THE FILES AND FOLDERS SHOWN IN THE IMAGE ABOVE. THE FINDER WINDOW IN THE CENTRE OF THE SCREEN, IS THE FINISHED PRODUCT, AFTER RESTORING DVD 1 TO IT, AND COPYING THE FILES/FOLDERS FROM DVD 2
I shall write a full tutorial in time, but trust me - this saves scratching/damaging DVDs for which you have no replacement, AND it is blisteringly FFFFASSSTT!!. I have just installed EVERYTHING in 12 mins flat (from separate INTERNAL SATA2 partition on Macintosh HD).
I feel proud of my achievement!!

